
Have you ever thought about how convenient it would be to open your garage door with just the push of a button without leaving your warm and cozy car?
Well, it’s possible! Especially during those short, cold winter days or when the rain is pouring down in buckets.
By using a HomeLink garage door opener, you can experience this luxury. And trust us, once you try it, you’ll wonder how you ever lived without it.
But how do I program this magical device without a remote?
Don’t worry.
It’s not rocket science.
Although, you have to make sure to follow the steps correctly to achieve a successful programming process.
What Is a HomeLink Garage Door Opener?
HomeLink isn’t just a basic garage door opener. It’s a super cool wireless control system in your car.
You can use it to open and close your garage door and your front gate, activate or deactivate your home security system, and even turn off lights and electronics.
Older HomeLink systems came with remotes, but newer versions are even better. They’re integrated into the design of your vehicle, so all the buttons and controls are right there.
This means if you want to use a newer HomeLink system, you’ll need to know how to set it up without a remote.
Why Use a HomeLink Garage Door Opener?
HomeLink is not just a regular garage door opener. It’s a super cool and convenient control system that comes in some cars.
With QuickTrain technology, you can easily set it up by pressing a few buttons, and voila! You can now control your garage door, gate, and your home’s security system from your car.
And the best part is you won’t have to change batteries since your car powers it.
HomeLink works with most garage door openers, gates, and other radio-controlled devices so that you can control up to three things all in one place.
No more running out of batteries or carrying extra remotes!
You can also use HomeLink apps to control lights and security systems, and you’ll even be informed if your garage door is open or closed when you’re away.
So, you can have peace of mind knowing everything is safe and secure at home.
How to Program a HomeLink Garage Door Opener Without a Remote: Step-By-Step Instructions
Home automation has made it easier than ever to control different systems in your home, and the garage door is no exception.
The HomeLink garage door opener system is a popular choice among homeowners, allowing you to control your garage door using your car’s transceiver.
Programming a transmitter to a rolling code opener
Before you begin, it’s important to note that the steps may vary depending on whether you have a rolling code or fixed code opener.
Rolling code openers are more common, as they automatically change the code after each use for security purposes.
Examples of rolling code openers include Genie’s Intellicode and LiftMaster/Sears’ Security Plus.
With that said, here’s how to program a HomeLink garage door opener without a remote:
1. Prepare the car
To get started, ensure the car door is shut and the key is out of the ignition. If the car door is open or the key is in the ignition, the programming process will not work.
2. Clear previous programs
Before you begin, you need to clear any programs left over from the factory. To do this, hold down the two buttons on the outside of the HomeLink system in your car simultaneously until you see the in-car LED begin to flash rapidly.
This may take up to a minute.
3. Program the button
Choose the button you want to use as the in-car garage door transmitter, and press and hold it down along with the transmit button. Continue holding the buttons until you see the HomeLink LED starts flashing rapidly.
4. Press the learn button
Next, you must link the in-car transmitter to your garage door opener. Locate the learn code button on your garage door opener, and press it momentarily.
The indicator light will turn on and start blinking, and you have 30 seconds to complete the programming process.
If you have a Genie system, press the in-car transmitter button three or four times.
If you have a Sears, LiftMaster, or Linear Megacode system, press and hold the PROGRAM button until you see the LED light flashing on the garage opener.
Keep pressing the button until the garage door operates through the system.
5. Test the system
Finally, it’s time to test the system to see if it has been programmed successfully.
Press the PROGRAM button, and check if the garage door opens and closes. If it doesn’t, repeat the steps.
With these steps, you can program your HomeLink garage door opener without a handheld remote. Keep in mind that the process may differ slightly depending on the type of opener you have and the make and model of your car.
However, this guide should give you a good starting point.
Programming a transmitter to a fixed code opener
If you have a garage door opener unit installed in your home, you know the convenience it brings to your daily life.
With the push of a button, you can easily access your garage without stepping out of your car.
However, older units may have different features than newer models, such as the ability to program a remote transmitter without a garage door opener remote.
Understanding Fixed Code Openers
Fixed code openers are garage door openers that use a single code that can be changed manually with DIP switches. This means you can change the passcode for your garage door just like you change the password for your phone.
The passcode will stay the same until you change it to a new one.
Most units built before 1996 will use fixed code openers.
However, if you have an older unit, you may need help finding instructions on how to program it without a remote.
How to Program a Fixed Code Opener Without a Remote
The process of programming a fixed code opener without a remote is similar to the process of programming it with a remote. Here are the steps you need to follow:
- Ensure the key is not in the ignition and the garage door is closed.
- Clear out any old programming from the in-car remote to default settings.
- Hold the transmitter up to the HomeLink button you want to program.
- Press both the HomeLink button and the transmitter button at the same time.
- Hold both buttons until the LED on the in-car remote begins to flash rapidly.
Once the LED on the in-car remote begins to flash rapidly, your fixed code opener should be programmed.
Tips for a Successful Programming Session
To ensure that you have a successful programming session, keep these tips in mind:
- Ensure you have clear access to the HomeLink button you want to program.
- Keep the transmitter close to the HomeLink button while programming.
- Be patient while the LED on the in-car remote is flashing rapidly. This may take a few minutes.
Maintaining Your Transmitter
It is important to keep your transmitter in good working condition to continue functioning properly. Here are a few tips to keep in mind:
- Avoid exposing your transmitter to extreme heat or cold.
- Keep your transmitter dry and protected from moisture.
- Replace the batteries in your transmitter regularly to ensure optimal performance.
How to Program HomeLink Garage Door Opener for All Genesis Model Vehicles
Genesis vehicles, synonymous with luxury and cutting-edge technology, offer many user-friendly features, including the integrated HomeLink wireless control system.
This control system makes it easy to operate your home garage door and other remotely operated home systems directly from your vehicle.
This step-by-step guide will assist you in programming the HomeLink system in your Genesis vehicle.
Steps:
- Initiate Programming Mode:
- Start your Genesis vehicle or switch it to the accessory/on position.
- Start your Genesis vehicle or switch it to the accessory/on position.
- Select the HomeLink Button:
- Decide which of the three HomeLink buttons you want to program.
- Press the selected button; the HomeLink indicator light on your rearview mirror will begin to flash orange.
- Decide which of the three HomeLink buttons you want to program.
- Remote Positioning:
- Hold the remote control you wish to copy 1 to 3 inches away from the rearview mirror.
- Press and hold the button on your remote. Keep holding it until the HomeLink indicator light changes from flashing orange to solid green.
- Hold the remote control you wish to copy 1 to 3 inches away from the rearview mirror.
- Testing the Connection:
- Press the programmed HomeLink button. If the indicator light remains solid green and your device (e.g., garage door) operates, the programming is successful.
- Press the programmed HomeLink button. If the indicator light remains solid green and your device (e.g., garage door) operates, the programming is successful.
- Rolling Code Technology (If Applicable):
- If your garage door or other device doesn’t respond, it may be because it uses rolling code technology for security.
- Find the Learn, Smart, Set, or Program button on your garage door opener and press it.
- Within 30 seconds, go back to your Genesis and press and hold the HomeLink button you’ve been programming for 2 seconds. You might need to repeat this pressing and holding process up to three times. Once your garage door responds, the programming is complete.
- If your garage door or other device doesn’t respond, it may be because it uses rolling code technology for security.
- Modifying a Pre-programmed Button:
- If you want to change a previously programmed button, press and hold it until the indicator light flashes orange.
- Follow the earlier steps (2-5) to reprogram with a new remote.
- If you want to change a previously programmed button, press and hold it until the indicator light flashes orange.
- Clearing All Previous Programming:
- If you want to erase all previous programming from all buttons, press and hold HomeLink buttons 1 and 3 simultaneously.
- Once the indicator light changes to rapidly flashing green, release both buttons. All programming is now erased.
- If you want to erase all previous programming from all buttons, press and hold HomeLink buttons 1 and 3 simultaneously.
Programming your HomeLink system in your Genesis vehicle can simplify your daily routine by integrating your vehicle with your home’s systems.
Remember, for additional details or assistance, you can always refer to the MyGenesis platform and your vehicle’s owner manual.
How to Program the HomeLink Garage Door Opener in Ford Vehicles
HomeLink is an integrated garage door opener system available in many Ford vehicles, allowing you to remotely control garage doors, gates, and even home lighting.
It offers the convenience of replacing multiple remote controls with one built-in system. Here are the steps on how to program the HomeLink system in your Ford vehicle.
Step-by-Step Guide:
- Initial Setup:
- Start your Ford vehicle.
- Have your old garage door transmitter handy.
- Begin Programming:
- Hold your old transmitter a few inches away from the HomeLink button you wish to program in your Ford.
- Simultaneously press and hold both the transmitter button and the chosen HomeLink button.
- Keep holding both buttons until the HomeLink indicator light changes from a slow blink to a rapid blink.
- Hold your old transmitter a few inches away from the HomeLink button you wish to program in your Ford.
- Activation:
- Press and hold the programmed HomeLink button for five seconds, then release it. Your garage door should operate.
- If the door doesn’t move, repeat the five-second press and hold.
- If the HomeLink indicator light remains solid, your programming is successful.
- If the indicator light flashes rapidly and then becomes constant, additional steps are needed.
- Press and hold the programmed HomeLink button for five seconds, then release it. Your garage door should operate.
- Additional Programming for Rolling Code Technology:
- You will need to act quickly, so consider having someone assist you.
- Press and hold the ‘Learn’ button located on your garage door opener motor.
- Return to your Ford and press and hold the programmed HomeLink button for two seconds, then release.
- Repeat the two-second press and release.
- To program other buttons, follow the steps again using a different button.
- You will need to act quickly, so consider having someone assist you.
- Programming a Previously Linked Transmitter:
- Press and hold the desired HomeLink button until the indicator light starts to flash.
- Without releasing the button, turn on your vehicle’s ignition.
- Once the programming is complete, the indicator should remain solid.
- Press and hold the desired HomeLink button until the indicator light starts to flash.
Programming the HomeLink system in your Ford vehicle provides convenience and enhances security.
With these steps, you should be able to seamlessly integrate your garage door operations with your car, removing the need for multiple remotes.
Should you face any challenges, always refer to your vehicle’s user manual or consult with a Ford service technician.
Programming the HomeLink Garage Door Opener for Volvo Cars
The HomeLink system, integrated into Volvo vehicles, offers an easy and convenient way to control your garage door without the need for an additional remote.
Follow these simple steps on how you can program the HomeLink device in your rearview mirror to work seamlessly with your garage door opener.
Step-by-Step Guide:
- Preparation:
- Ensure your garage door is functioning properly with its original remote.
- Sit inside your Volvo, with access to both your garage door remote and the HomeLink device in your rearview mirror.
- Ensure your garage door is functioning properly with its original remote.
- Positioning the Garage Door Remote:
- Hold your garage door remote control approximately one to three inches away from the HomeLink button you intend to program.
- Ensure the indicator lamp on the HomeLink is not obstructed while doing so.
- Hold your garage door remote control approximately one to three inches away from the HomeLink button you intend to program.
- Synchronizing Remote with HomeLink:
- Simultaneously press and hold both the button on your garage door remote control and the HomeLink button you’re programming.
- Keep an eye on the HomeLink indicator lamp. Wait for its transition from a slow flash (approximately once per second) to either:
- A fast flash (approximately 10 times per second) OR
- A steady, constant glow.
- A fast flash (approximately 10 times per second) OR
- Simultaneously press and hold both the button on your garage door remote control and the HomeLink button you’re programming.
- Completing the Programming:
- If the HomeLink indicator lamp displays a constant glow, the programming is successful. Press the programmed button twice to activate the garage door.
- If the lamp flashes rapidly, it suggests that the garage door device has a security function that needs additional steps.
- If the HomeLink indicator lamp displays a constant glow, the programming is successful. Press the programmed button twice to activate the garage door.
- Handling Security Functions (If Required):
- Locate the programming button on your garage door receiver. This is typically near the antenna’s bracket.
- Briefly press and release the receiver’s programming button once.
- Afterward, press and release the HomeLink button you’ve been programming.
- Locate the programming button on your garage door receiver. This is typically near the antenna’s bracket.
Programming your Volvo’s HomeLink system for your garage door opener offers enhanced convenience and security.
With these steps, you should have a seamless connection between your Volvo and your garage.
Should any issues arise, consider consulting your Volvo’s owner manual or contacting your dealership for additional support.
Programming Your Subaru Vehicle’s HomeLink Garage Door System
Subaru vehicles, known for their reliability and versatility, also come equipped with the convenience of the HomeLink system.
This system replaces the need for separate remotes, enabling you to open your garage door directly from your vehicle.
Let’s walk through the steps to set up your Subaru’s auto-dimming mirror with HomeLink to your garage door.
Step-by-Step Guide:
- Initiate HomeLink Programming:
- Inside your Subaru, press and release the HomeLink button you wish to program. An orange light on the HomeLink indicator will begin flashing slowly.
- Inside your Subaru, press and release the HomeLink button you wish to program. An orange light on the HomeLink indicator will begin flashing slowly.
- Synchronize with Handheld Remote:
- With the orange light flashing, position your existing garage door remote 1-3 inches from the HomeLink button you are programming.
- Press and hold the button on your handheld remote until the HomeLink indicator light turns green.
- Press the HomeLink button you’ve programmed; if the light remains constant green, programming is successful.
- With the orange light flashing, position your existing garage door remote 1-3 inches from the HomeLink button you are programming.
- Alternate Steps for Different Garage Door Models:
- If the HomeLink indicator flashes green rapidly instead of a constant green:
- Firmly press the HomeLink button, hold for two seconds, and then release.
- Repeat this process three times.
Note: For certain garage door openers, you may need to press and release a ‘learn’ button located on your garage door opener. It’s helpful to have someone assist you during this process.
- Firmly press the HomeLink button, hold for two seconds, and then release.
- After pressing the ‘learn’ button, within 30 seconds, press the HomeLink button, hold for two seconds, and release.
- Do this action three times. The garage door should close after the third sequence.
- If the HomeLink indicator flashes green rapidly instead of a constant green:
- Two-Way Communication Feature (if supported by your garage door opener):
- If unsure about the status of your garage door (opened or closed), press the first two HomeLink buttons.
- HomeLink will display an up or down arrow, indicating the last known position of your garage door.
- If unsure about the status of your garage door (opened or closed), press the first two HomeLink buttons.
With your Subaru’s integrated HomeLink system, opening and closing your garage door becomes a seamless task.
Remember, various garage door models may have slight differences in their pairing procedures, so always keep your owner’s manual handy for any specific details or troubleshooting.
Now, enjoy the added convenience and safety provided by your Subaru’s HomeLink system.
How to Program Your Tesla’s HomeLink to Control Your Garage Door
If you’re a Tesla owner, you might have heard about the convenient HomeLink feature.
This built-in technology allows Tesla vehicles to communicate with your garage door, making the process of opening and closing it effortless.
Here are the steps to set up HomeLink for your Tesla.
Requirements:
- A Tesla Model (compatible with HomeLink).
- The latest update features the HomeLink icon.
- A garage with a functional door and its remote.
- Optional: $350 for the HomeLink feature (It’s a one-time fee with no monthly charges).
Step-by-Step Guide to Programming HomeLink
1. Locating the HomeLink Icon:
- Once the HomeLink feature is added to your Tesla, you’ll see a new icon on your vehicle’s dashboard. This symbol looks like a house with a garage door.
2. Setting up HomeLink:
- Tap the HomeLink icon on your dashboard.
- Click on ‘Create HomeLink’.
- You will be prompted to name your HomeLink (e.g., “Large Garage”).
- Select the ‘Standard Mode’, which functions like a regular garage opener.
3. Pairing with the Garage Remote:
- After naming your HomeLink, the next step involves your garage remote.
- You’ll be instructed to stand in front of your Tesla, with the remote pointing towards the front bumper.
- Press and hold the remote button until the Tesla’s headlights flash. This indicates the car is recording the remote’s signal.
4. Training the Garage Receiver:
- Locate the ‘learn’ button on your garage door machine. This button is typically found behind the cover of the garage machine.
- Once located, press the ‘learn’ button. An LED light might turn on, indicating the machine is in learn mode.
- Return to your Tesla and tap ‘Continue’ on the screen.
- The car will now communicate with the garage receiver, finalizing the pairing process.
5. Test the Connection:
- To ensure everything is set up correctly, test out the new connection by pressing the HomeLink icon and watching to see if the garage door responds as expected.
HomeLink is a game-changer for Tesla owners, making the process of entering and exiting the garage seamless.
The setup might seem a bit technical, but with this guide, you’ll have it up and running in no time.
Safe driving and enjoy the convenience of your newly integrated tech!
How to Easily Program Your HomeLink Garage Door Opener on Jeep Wrangler JL
The HomeLink system, integrated into your Jeep Wrangler JL, is more than just a convenient tool. It’s a gateway to a hassle-free start to your day.
However, setting it up can be a bit challenging.
Let’s walk through the steps to seamlessly program your HomeLink Garage Door Opener on Jeep Wrangler JL, ensuring that your garage door woes are a thing of the past.
Step 1: Powering Up
Firstly, ensure your vehicle is in the ‘run’ mode. This doesn’t mean starting the engine completely but providing enough power to activate the HomeLink system.
It’s a simple yet important step in the programming process.
Step 2: Clearing Old Codes
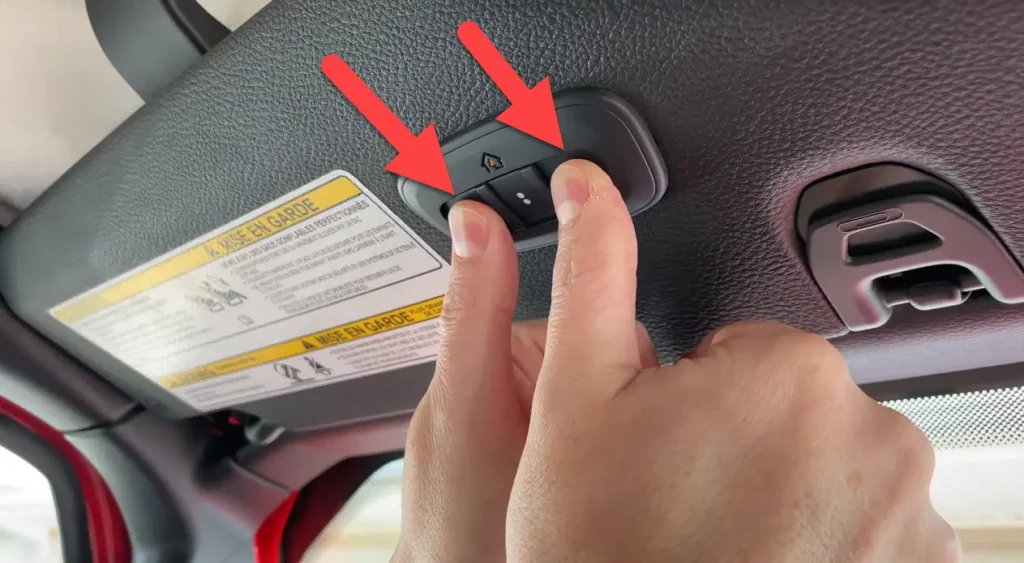
Image courtesy by Eighty Two Media
Clearing any previous settings is essential whether your Jeep is brand new or pre-owned.
Press and hold the first and third buttons on the HomeLink keypad. A rapidly flashing light indicates the old codes are erased, which may take 20 to 30 seconds.
Understanding the Two Types of Garage Doors
Before proceeding, it’s important to identify the type of garage door you have. There are mainly two kinds:
- Old Style Garage Doors: These are standard, without rolling codes.
- New Style Garage Doors with Rolling Codes: These offer enhanced security features.
Step 3: Programming the Garage Door Opener
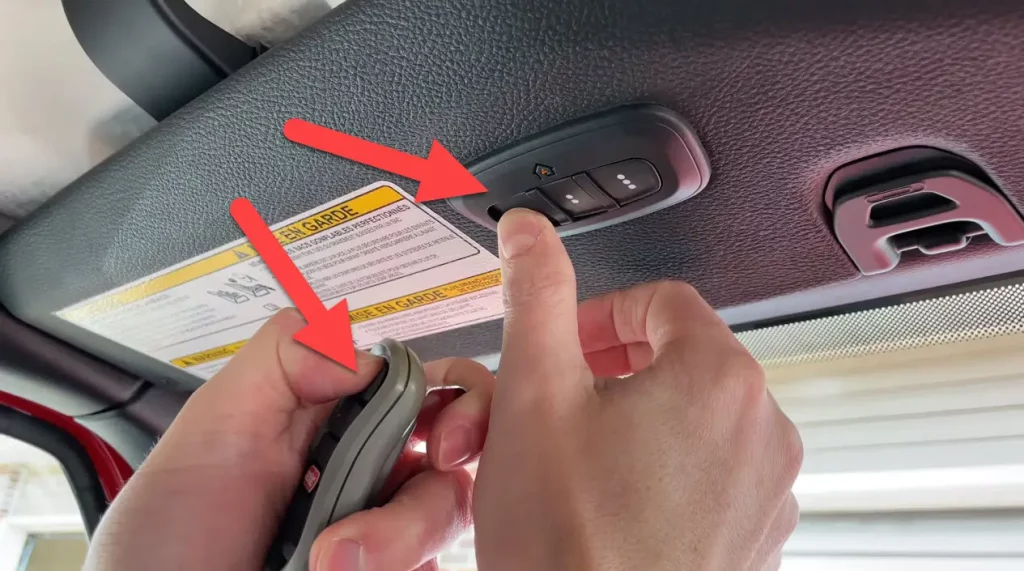
Image courtesy by Eighty Two Media
This step might be your last if you own an old-style garage door. For those with a new-style door, there’s an additional step afterward.
Here’s what to do:
- Press down the button on your garage door remote.
- Simultaneously, press the desired HomeLink button in your vehicle.
- Wait for the light on the HomeLink system to flash rapidly, indicating successful programming.
Step 4: The Final Touch for New Garage Doors
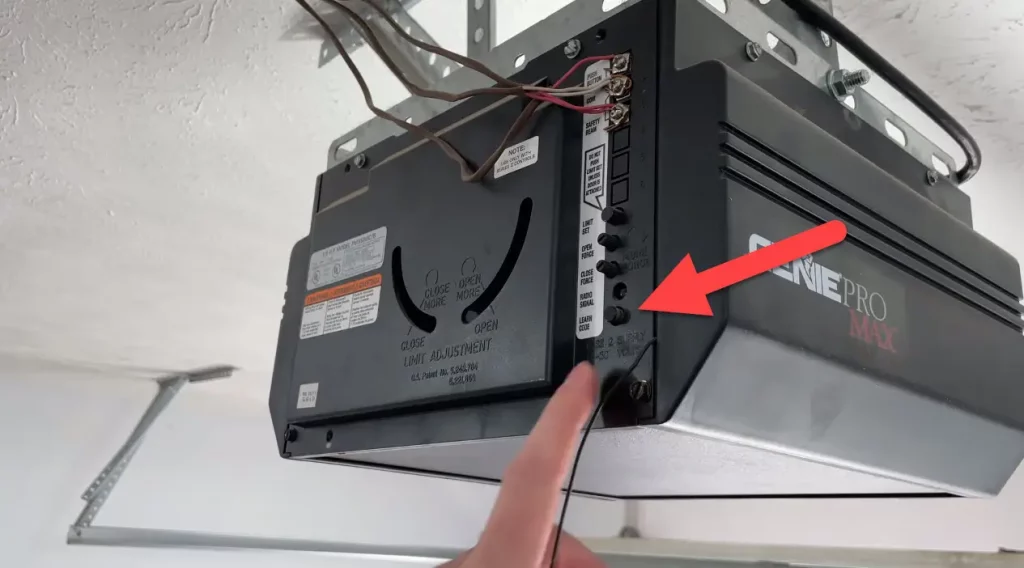
Image courtesy by Eighty Two Media
This step is exclusively for rolling code garage doors. Locate the ‘Learn’ button on your garage door opener. It might be at the back or front.
After pressing this button, you have 30 seconds to a minute to complete the next part:
- Rush back to your Jeep.
- Firmly press and hold the programmed HomeLink button for a couple of seconds.
- Release and repeat this process twice.
If done correctly, your garage door should respond, indicating successful synchronization.
Can I program multiple garage doors to my Jeep Wrangler JL’s HomeLink system?
Yes, you can program multiple garage doors to your Jeep Wrangler JL’s HomeLink system. The system typically has three buttons, allowing you to program up to three different garage doors or gates. Follow the same programming steps for each button to correspond with each garage door opener or gate system.
What should I do if my HomeLink doesn’t program on the first try?
If the HomeLink system doesn’t program on your first attempt, don’t worry. Double-check that your vehicle is in the correct mode and following the steps accurately. If it’s a rolling code garage door, complete the final synchronization step promptly. If it still doesn’t work, consult your vehicle’s manual or contact a professional.
Programming your HomeLink Garage Door Opener on the Jeep Wrangler JL is not just about following steps but embracing modern technology to make life easier. Remember, every car and garage door might have its unique quirks. If you encounter any issues, feel free to leave a comment below. Your experiences could help fellow Jeep owners navigate similar challenges.
Frequently Asked Questions
Can you program a garage door opener from another remote?
You may be surprised to learn that it’s possible. However, standard garage door remotes cannot read and clone signals from a pre-programmed remote and use them to open your door. For this to work, you need a remote that another device can program.
What do I do if I lose my garage door opener?
You can easily purchase a replacement remote from the original unit’s manufacturer. For quality assurance, we suggest looking into LiftMaster® to ensure you’re buying a top-quality device. Once you have the right remote control, it’ll be easy to get back in and out without any problem.
Can I convert my garage door opener to smart?
Have you ever wondered if it’s possible to make an old garage door opener more modern and smart? If your unit was manufactured after 1993, the answer is most likely yes! However, if your garage door opener was made before ’93, you might need to purchase a brand-new smart opener. Doing this will give you access to the latest technology and features, allowing for easy and convenient access every time you enter and leave your garage.
Can you hack a garage door opener?
Older units contain a fixed code transmitted over radio frequencies. For those with the right hacking abilities and access to a device like a code grabber, it wouldn’t be too difficult to gain entry into your garage by simply recording and utilizing the sender’s code. By recognizing this security risk and protecting yourself appropriately, you can rest assured that your property is safe and secure.
Can you close a garage door with a keypad without a code?
Did you know a garage door can be closed with a keypad without entering the code? Instead, you can make use of the ENTER button as a shortcut! This can often be more convenient than accessing the manual close button from within your garage. Look for the Quick Tips guide on enabling this feature to learn more.
So You Can Now Program Your HomeLink Garage Door Opener
Have you ever wished you could open or close your garage door with the simple click of a button?
With HomeLink Connect technology, this is now a reality. Programming a garage door opener without a remote control can be tricky but worthwhile.
You have more control over your home’s garage door, and you can also use HomeLink to operate other electronics in your home.
This means more time for activities and family pursuits instead of standing out in frigid temperatures trying to deal with the garage door manually.
The best part is being able to say, “I did it!” when you look back on programming HomeLink yourself. If you’ve successfully programmed a garage door opener, with or without a remote, share your story in the comments below.


