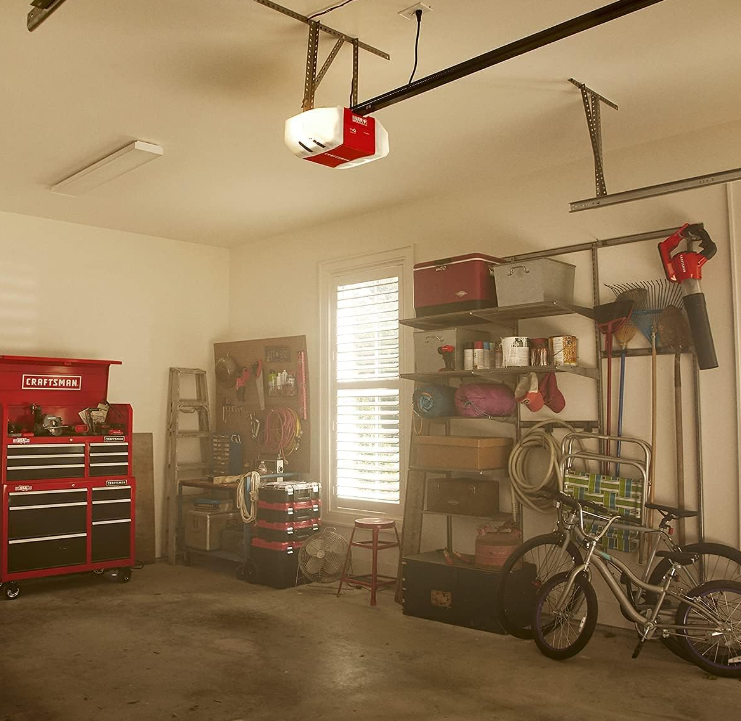
Imagine a rainy day, the kind where the skies are a deep grey, and the raindrops fall steadily, creating a rhythmic yet soothing sound.
It’s cold outside, and all you want is to stay warm and dry. This is where the magic of a Craftsman garage door opener shines.
With a simple push of a button, your garage door obediently opens, allowing you to drive in without facing the harsh elements. It’s an everyday luxury that we often take for granted – until the day it stops working.
But don’t worry, if your Craftsman garage door opener starts acting up, there’s usually an easy fix.
Let’s explore some common problems and their solutions.
Understanding Your Craftsman Garage Door Opener
Getting to know the basic components of your Craftsman garage door opener is crucial for effective troubleshooting:
- Motor Unit: Powers the opening and closing of the garage door.
- Remote Control/Wall Switch: Sends operational signals to the motor unit.
- Safety Sensors: Ensure the path is clear for the door to close safely.
Craftsman Garage Door Openers Overview
Understanding the type of Craftsman garage door opener you have is crucial for troubleshooting and maintenance.
Here’s a detailed breakdown of the four different kinds offered by Craftsman, each with its unique features:
1/4 HP Belt Drive Opener
- Drive Type: Uses a belt instead of a chain.
- Power Backup: Equipped with a battery backup for power outages.
- Notable Feature: Less powerful but offers smooth and quiet operation.
1/2 HP Chain Drive Opener (Two Varieties)
- Drive Type: Operates using a chain drive system.
- Variety 1: Comes with a keypad for easy access.
- Variety 2: Does not include a keypad.
- Power Backup: No battery backup is available.
- Notable Feature: Offers a balance of power and efficiency.
1/2 HP Belt Drive Opener
- Drive Type: Utilizes a belt drive mechanism.
- Access Features: Includes a keypad for convenient entry.
- Power Backup: Lacks a battery backup option.
- Notable Feature: Provides quieter operation compared to chain drives.
3/4 HP Chain Drive Opener
- Drive Type: Employs a robust chain drive.
- Power Backup: Does not come with a battery backup.
- Notable Feature: The most powerful option, ideal for heavy garage doors.
Each of these models has specific advantages and functionalities tailored to different needs and preferences.
When troubleshooting, knowing which model you own can guide you to more precise solutions.
Craftsman Garage Door Opener Troubleshooting
Just like any other machine, your garage door opener may have some hiccups now and then.
To avoid any problems, Sears suggests you take good care of them by doing regular check-ups and maintenance.
Craftsman garage door openers are renowned for their reliability and ease of use. However, like all mechanical devices, they can occasionally encounter issues.
Understanding common problems and their solutions can help you quickly get your garage door opener back in working order.
Here’s a guide to some typical issues and how to troubleshoot them.
Garage Door Opener Doesn’t Respond to Remote or Keypad But Works With Wall Switch
You find that your garage door operates smoothly using the wall switch, yet there’s no response when using the remote control or keypad.
Reasons and Solutions:
- Frequency Interference:
- Reason: Electronic devices may disrupt the remote or keypad’s frequency.
- Solution: Turn off nearby electronic devices one by one to identify the source of interference. Once found, relocate the device or consult a specialist about changing your opener’s frequency.
- Reason: Electronic devices may disrupt the remote or keypad’s frequency.
- Worn-Out Remote/Keypad:
- Reason: The internal contacts might degrade over time.
- Solution: If changing batteries doesn’t help and there’s no signal interference, it might be time to replace the remote or keypad. Check if it’s under warranty for a possible replacement.
- Reason: The internal contacts might degrade over time.
- Memory Capacity:
- Reason: The opener’s memory is full, common with long-term use of multiple remotes.
- Solution: Reset the memory by pressing the learn button until the light goes off. Then, reprogram your remotes and keypads.
- Reason: The opener’s memory is full, common with long-term use of multiple remotes.
- Outdated Technology:
- Reason: Older models may struggle with newer universal remotes or accessories.
- Solution: If your opener is significantly old, upgrading to a newer model might be the best solution, providing better security and compatibility.
- Reason: Older models may struggle with newer universal remotes or accessories.
- Antenna Issues:
- Reason: The antenna on the motor unit may be damaged or improperly positioned.
- Solution: Inspect the antenna to ensure it’s undamaged and hanging down. Replace it if necessary.
- Reason: The antenna on the motor unit may be damaged or improperly positioned.
- Locked Mode:
- Reason: The opener’s lock/security feature, designed to disable remotes, might be activated.
- Solution: Ensure that the lock mode is deactivated. This mode can usually be toggled via the wall switch or console.
- Reason: The opener’s lock/security feature, designed to disable remotes, might be activated.
ALWAYS REFER TO YOUR SPECIFIC CRAFTSMAN MODEL’S USER MANUAL WHEN TROUBLESHOOTING, AS THERE MAY BE MODEL-SPECIFIC STEPS OR SOLUTIONS. IF YOU’RE UNCOMFORTABLE TROUBLESHOOTING OR BELIEVE THE PROBLEM IS BEYOND A SIMPLE FIX, IT’S BEST TO CONSULT WITH A PROFESSIONAL TECHNICIAN.
Craftsman Garage Door Opener Light Doesn’t Turn On
It can be frustrating when your Craftsman garage door opener operates correctly, but the built-in light doesn’t turn on with activation.
The light feature is not just for visibility; it’s also a safety feature, so addressing this problem is essential.
Reasons and Solutions:
1. Burnt Out Bulb:
- Reason: The most obvious reason could be a burnt-out light bulb.
- Solution: Replace the light bulb with a bulb recommended in the Craftsman owner’s manual. Ensure you’re using a bulb compatible with garage door openers, as some LED bulbs can interfere with the remote signal.
2. Light Socket Issues:
- Reason: The light socket where the bulb screws in may have malfunctioned or become corroded.
- Solution: Turn off the power to the garage door opener, remove the bulb, and inspect the socket for any visible damage or corrosion. Clean any corrosion using a small wire brush or contact cleaner. If the socket is damaged, you might need to replace it or consult a technician.
3. Bad Light Control Circuit:
- Reason: The control circuit board might have a failed component or a blown fuse affecting the light functionality.
- Solution: Inspect the control circuit board for any signs of burnt or damaged components. If you’re not familiar with circuit board diagnosis, it’s advisable to consult a technician or consider replacing the entire circuit board.
4. Door Control Button:
- Reason: Some models might have a separate light button on the wall-mounted door control. The button or its connecting wire might be malfunctioning.
- Solution: Press the light button on the door control. If it doesn’t work, ensure the wires connecting the door control to the opener are securely attached and undamaged. If the problem persists, consider replacing the door control unit.
5. Limitation Feature:
- Reason: Some Craftsman models might have a feature that limits the light’s operation time to save energy.
- Solution: Check the owner’s manual to see if your model has this feature and if it’s activated. If so, the manual will guide you on adjusting or disabling the light timer.
6. Safety Sensors Malfunction:
- Reason: The safety sensors at the base of the door tracks ensure the door doesn’t close on obstructions. If they malfunction, they might also impact the light.
- Solution: Ensure the sensors are aligned correctly and free from obstruction. Clean the sensor lenses with a soft cloth, and ensure the sensor LEDs are glowing, indicating they’re powered and aligned.
Craftsman Garage Door Opener Beeps Continuously
Your Craftsman garage door opener works fine in opening and closing, but you notice a continuous or periodic beeping sound from the main unit.
This isn’t just a minor annoyance; it could signal an underlying issue.
Reasons and Solutions:
1. Backup Battery is Low or Depleted:
- Reason: Many modern garage door openers have a backup battery to ensure functionality during power outages. The opener might beep to alert you when this battery is low or dead.
- Solution: Replace the backup battery. Refer to your owner’s manual for guidance on the correct battery type and the replacement procedure. After replacing, the beeping should cease if the battery was the issue.
2. Misalignment of Safety Sensors:
- Reason: As mentioned previously, safety sensors ensure nothing obstructs the door. If these sensors become misaligned, the opener might beep as a warning.
- Solution: Adjust the safety sensors so they’re directly facing each other. Clean any dirt or cobwebs that might be blocking the sensors. Ensure the indicator lights on both sensors are stable and not flickering.
3. Overheating of the Motor:
- Reason: Continually using the garage door opener over short intervals can cause the motor to overheat, resulting in beeping as a warning.
- Solution: Give the motor time to cool down by not using the opener for an hour. To prevent this from recurring, avoid excessive use in short durations.
4. Error in the Control Panel or Circuit Board:
- Reason: An error in the system, possibly due to power surges or short circuits, might cause the unit to beep.
- Solution: Disconnect the opener from the power source, wait for a few minutes, and reconnect. This can act as a ‘reset’ for the system. If the beeping continues, there might be a more significant issue with the control panel or circuit board, which may require professional intervention or replacement.
5. Updates or Malfunctions in Smart Features:
- Reason: Some modern Craftsman garage door openers have smart features that connect to Wi-Fi or other home systems. The beeping might be an indication of required updates or malfunctions.
- Solution: Check any associated apps or software to ensure no pending updates. Ensure that the Wi-Fi connection is stable. If you suspect a malfunction in the smart feature, refer to the owner’s manual or contact customer support for guidance.
6. Memory Full from Remote Codes:
- Reason: Some units have a maximum number of remote codes they can store. If the memory is full, the unit might beep.
- Solution: Clear old or unnecessary remote codes from the system. Refer to your owner’s manual for guidance on managing and deleting remote codes.
Garage Door Won’t Close
If your Craftsman garage door opener refuses to close and displays flashing lights, it’s likely an issue with the safety sensors.
Reasons and Solutions:
- Obstruction in Path:
- Reason: The door may not close if it detects an obstruction.
- Solution: Inspect and clear any debris or objects that might be blocking the door’s path.
- Reason: The door may not close if it detects an obstruction.
- Misaligned Safety Sensors:
- Reason: Sensors not facing each other can cause malfunction.
- Solution: Align the safety sensors on both sides of the door to ensure accurate detection.
- Reason: Sensors not facing each other can cause malfunction.
- Damaged Safety Sensor Cables:
- Reason: Worn out or damaged sensor cables.
- Solution: Check and replace sensor cables if they show signs of damage or wear.
- Reason: Worn out or damaged sensor cables.
- Incorrect Travel Limit Setting:
- Reason: The door may pause or not close if the travel limit is set incorrectly.
- Solution: Adjust the travel limit to set the correct opening and closing distance for the door.
- Reason: The door may pause or not close if the travel limit is set incorrectly.
Garage Door Opens or Closes Halfway
A garage door that only opens or closes halfway is a common issue with a few potential causes and solutions.
Reasons and Solutions:
- Binding of Garage Door:
- Reason: The door may bind if the trim board is too close, restricting movement.
- Solution: Use a shim to create more space or trim the excess off the trim board to allow smoother door operation.
- Reason: The door may bind if the trim board is too close, restricting movement.
- Incorrect Travel Limit Setting:
- Reason: The door stops halfway because the travel limits are not set correctly.
- Solution: Reset the travel limit to ensure the door opens and closes to the desired points.
- Reason: The door stops halfway because the travel limits are not set correctly.
- Compromised Force Settings:
- Reason: Over time, the force settings may need adjustment as the door ages.
- Solution: Increase the force settings to maintain the power needed for lifting and lowering the door.
- Reason: Over time, the force settings may need adjustment as the door ages.
- Faulty RPM Sensor:
- Reason: The RPM sensor, which monitors the speed of the motor, might be malfunctioning.
- Solution: Have a technician calibrate or replace the RPM sensor to ensure safe and efficient operation.
- Reason: The RPM sensor, which monitors the speed of the motor, might be malfunctioning.
Wall Control Not Working
When the wall control of your Craftsman garage door opener is malfunctioning, it often presents a clear diagnostic signal.
Reasons and Solutions:
- Diagnostic Light Blinking (Three Times):
- Reason: This specific blinking pattern usually indicates a short circuit in the wire connection of the wall control.
- Solution: Inspect and repair any short circuits in the wall control’s wiring. This may involve checking for damaged wires, and loose connections, or replacing the wiring if necessary.
- Reason: This specific blinking pattern usually indicates a short circuit in the wire connection of the wall control.
Garage Door Opener Overheating
One common problem with Craftsman garage door openers is overheating, often traced back to the door motor or mechanism.
It’s important to recognize this issue early to avoid further complications.
Reasons and Solutions:
- Overworked Motor:
Reason: Continuous or excessive use can cause the motor to overheat.
Solution: Limit the use of the garage door opener and allow the motor to cool down. If the problem persists, inspect the motor for any signs of damage or wear. - Diagnostic LED Light Error:
Reason: A flashing diagnostic LED light or an error code indicates an overheating issue.
Solution: Check the diagnostic LED light. If it’s flashing five times or shows an error code, inspect the motor for overheating signs. - Manual Door Operation:
Reason: Overheating can hinder automatic operation.
Solution: Disconnect the opener using the emergency cord and manually operate the garage door. This allows the system to cool down and reduces strain on the motor. - Debris or Broken Components:
Reason: Obstructions or broken parts can cause the system to overwork and overheat.
Solution: Check for debris or broken components in the mechanism. Clear any obstructions and repair or replace damaged parts as soon as possible to prevent further issues and ensure safety. - Insufficient Ventilation:
Reason: Poor ventilation can contribute to overheating.
Solution: Ensure the garage has adequate ventilation to help disperse heat from the motor and other components of the garage door opener.
Garage Door Opener Beeping
Hearing a beeping sound from your Craftsman garage door opener is typically not a cause for concern. This sound is a built-in feature for user awareness and safety.
Reasons and Solutions:
- Closing Alert:
Reason: The beeping sound is an intentional alert indicating that the garage door is in the process of closing.
Solution: No action is required. The beeping is a safety feature to warn anyone nearby to stay clear of the closing door. - Battery Backup Activation:
Reason: In some models, beeping might signal the activation of the battery backup system due to a power outage.
Solution: Check if there’s been a power outage. If so, the beeping indicates that the opener is operating on its backup battery. The beeping should cease once the power is restored and the opener switches back to the main power supply.
IF NONE OF THESE SOLUTIONS WORKS, OR IF YOU’RE UNCERTAIN ABOUT ANY PROCEDURE, IT’S WISE TO CONTACT A GARAGE DOOR TECHNICIAN OR CRAFTSMAN CUSTOMER SUPPORT FOR ASSISTANCE. ALWAYS PRIORITIZE SAFETY, ESPECIALLY WHEN DEALING WITH ELECTRONIC OR MECHANICAL SYSTEMS.
How to Adjust a Craftsman Garage Door Opener
A garage door opener is a handy device that makes entering and leaving your garage much easier.
But what happens when it’s not working as it should be? To help ensure your garage door’s safe and smooth operation, it’s important to adjust it periodically.
Here, we’ll take you through the process step by step.
Setting the Door’s Travel Limits
The first step in adjusting your Craftsman garage door opener is ensuring the travel limits are set properly. To do this, simply run your garage door through a complete cycle of opening and closing.
If you notice any issues, use the limit adjustment screws on the garage door monitor to make adjustments. Remember that one turn of the screw usually equates to about 2 inches of door travel.
Adjust the Force
The next step is to adjust the upward and downward force of the garage door. Fine-tune the power using the screws on the garage door monitor until the door opens and closes correctly.
Once you’ve set the force, test the door by opening and closing it. If you can stop the door with your hands while it’s in operation, you’re good to go. If not, continue adjusting the force until the door stops when you interrupt it with your hands.
Why is adjusting the force so important? The door may crush anything while closing if the downward force is too strong.
On the other hand, if the upward force is too weak, the door won’t open all the way, trapping your vehicle inside.
Test the Safety Reversal System
- Start with adjusting the door.
- Once that is done, place a flat two-by-four under the open door.
- Close the door to see if it reverses when it comes into contact with the board. If it stops without reversing, increase the down limit until it passes the test.
Test the Protector System
Finally, it’s time to test the Protector System. If the system works properly, the door should move less than an inch before stopping, and the opener lights will flash.
While the door is in the up position, place a box in the door’s path to block the eye sensor. Then, use your remote to close the door.
Maintaining Your Craftsman Garage Door Opener: Step-by-Step Guide
Do you want your garage door opener to work smoothly and reliably? Then, it’s important to take care of it properly. With these five easy steps, you’ll keep your Craftsman garage door opener in tip-top shape.
Step 1: Sensor Check-Up
The first step to maintaining your opener is to inspect the sensors. These sensors are located at the bottom of the opener and help prevent the door from hitting anything.
To see if they’re working, shine a flashlight on them and observe if the lights turn on. The sensors may be dirty or poorly aligned if the lights don’t turn on. To fix this, clean the sensors and adjust their position until the lights activate.
Step 2: Lubricate the Moving Parts
Next, it’s time to give the moving parts of your opener a little love. This includes the chain, gears, and bearings. Simply apply a few drops of oil to these parts and run the door up and down a few times to spread the oil evenly.
Step 3: Check the Door’s Balance
Step three is about checking the door’s balance. If the door is off balance, it can put extra stress on the opener and make it wear out faster. To check the balance, disconnect the opener and try lifting the door halfway up by hand.
If the door stays put, it’s balanced. But if it starts to fall, it’s time to make some adjustments.
Step 4: Tighten Any Loose Screws
In step four, we’ll be tightening any screws that have become loose over time. Loose screws can cause the opener to work less efficiently, so tightening them up is important. Use a screwdriver to tighten any screws that have become loose.
Step 5: Replace the Remote’s Battery
Finally, it’s time to replace the battery in the remote. Over time, the battery can lose its charge and stop the opener from working. To replace the battery, simply remove the old one and add a fresh one.
Frequently Asked Questions
What do five blinks mean on Craftsman garage door opener?
If you see five flashes of the light blinking, it could mean your opener isn’t detecting any rotations-per-minute (RPMs) during the first second. This typically indicates there’s a mechanical impediment at hand.
To help get things running again, check for and remove any debris or obstructions from the door’s path before attempting to open it again.
Why is the light flashing on my Craftsman garage door opener?
If the light is flashing, it could be due to a wiring issue. This can prevent the door from closing correctly and cause the light to blink continuously. To fix this problem, it’s best to have an expert inspect your system and identify any wiring issues that need repair.
What do two blinks mean on Craftsman garage door opener?
If you see two flashing lights, there is a chance that something is wrong with the wiring. The safety eyes may not be glowing steadily. That usually happens if the black and white wires are switched around, or the sensor wire is shorted. To check this, look at the wiring to ensure it isn’t bent or damaged.
Why is the green light flashing on my Craftsman garage opener?
If the green light blinks, that may be due to the misalignment of sensors. You’ll need to adjust them, so they are in the correct spot and position. If you set them up properly, the green receiver sensor should be solid and not flash.
After making sure everything is in order, your opener will no longer blink, and it should now work properly.
What are the three buttons on a Craftsman garage door opener?
Craftsman garage door openers come with three buttons: one to open the door and two other buttons that can be used to lock it or turn on the light. To use the open button, simply press it, and the garage door will move up or down. The locking button is only compatible with certain models, so check your opener’s manual before using this feature.
Conclusion
If you’re facing a challenge that you can’t fix on your own, it might be time to reach out for professional assistance. You can try some simple troubleshooting steps for your Craftsman garage door opener by observing the unit as you attempt to use it.
This can give you an idea of what might be causing the problem. However, if you can’t figure out the issue or it’s something you’re not confident in fixing, don’t hesitate to call an expert.
While there may be some issues you can handle on your own, it’s always a good idea to call in a pro who is experienced with garage door openers if you’re unsure.
A professional can make necessary adjustments and replace broken parts to get your opener working again. They’ll also make sure that your unit operates safely.


