Have you been working on a renovation project in the kitchen or bathroom and wondering how to ensure proper ventilation for your pipes? Don’t be alarmed; even if this is new territory for you, there are straightforward techniques for achieving this goal.
Do some research online, and you’ll find various methods of plumbing vent diagrams. But don’t rush into picking one without understanding its pros and cons. Whether it’s a brand-new sink, tub, or toilet, it’s essential to properly vent your piping system.
So don’t let this task confuse you, take charge and adequately vent those pipes with no hassles.
Understanding the Plumbing Vent
Have you ever opened the cabinets under a sink and seen a P-shaped tube directly under the drain? Well, that’s called a P-trap, and it starts the process of removing water and waste while venting out any sewer gasses.
All the drain pipes in your home, from your showers, sinks, tubs, and appliances, connect to carry water away after you’re done using it. The water then flows into slightly bigger drain pipes until they reach the stack pipe.
This pipe takes everything out of your home through the roof and into the main sewer lines underground. While water and waste head down the pipe, any gasses are vented upwards and outwards.
The stack pipe also lets fresh air in to ensure water flows smoothly through the pipes. But if the stack wasn’t there to properly ventilate, your home would smell terrible and fill with noxious sewer gasses.
That’s why ventilation pipes are often added to fixtures to ensure gasses can escape, while fresh air helps move sewage.
Even though it’s not a pleasant thought, the plumbing vent system is crucial for every household. So if you’re renovating, fixing your plumbing, or adding a new fixture, remember to ensure this system works properly!
Types of Vents
Ventilation is critical in any piping system, as it helps regulate air pressure, prevent blockages, and keep the pipes functioning correctly. There are four main types of vents used in piping systems: true vents, re-vent pipes, common vents, and loop vents.
Each type of vent serves a specific purpose and has its own unique set of advantages and disadvantages.
The True Vent
The true vent is the simplest type of vent, and it works by attaching vertically to the drain line through the roof. This type of vent is best suited for fixtures close to the main stack, as it allows the stack to serve as a vent.
One of the key advantages of the true vent is that there is no water flowing through it, which helps to keep the system clear and functioning properly.
However, it is important to note that the true vent is not always a viable solution, as fixtures are rarely located so close to the main stack.
Re-vent Pipes (Auxiliary Vents)
Re-vent pipes, also known as auxiliary vents, are a great option when your sink is far away from the main stack. These vents attach to the drain line near the fixture and run upward and over the main vent.
They can attach directly behind the fixture or horizontally to the drain line. Re-vent pipes are a versatile solution for addressing the unique challenges posed by the location of your fixtures.
The Common Vent
Common vents are a cost-effective solution that can be easily implemented to help keep your piping system functioning properly. Consider using a common vent when you have another fixture on the opposite side of the wall.
This type of vent allows both drain lines to tie together in a sanitary cross, which is ideal for back-to-back sinks.
The Loop Vent
The loop vent is a solution specifically designed for freestanding sink codes. This type of vent loops up and around before connecting to the drain pipe, which provides ample ventilation just behind the fixture.
Loop vents are an excellent option for meeting the unique requirements of your piping system, and they are also relatively easy to install and maintain.
Air Admittance Valves – An Alternative to Venting
In some cases, codes allow for air admittance valves as an alternative to traditional venting methods. These valves allow air to enter as waste drains, and they rely on gravity to seal it back up before any gases can escape into the room.
Air admittance valves are a relatively new solution, so it is important to check with your local codes before implementing them in your piping system.
Whether you are looking to upgrade your existing system or install a new one, it is important to choose the right type of vent to meet the unique needs of your fixtures and piping system. With the correct type of vent in place, you can help ensure your piping system’s longevity and efficiency for years to come.
Placing Your Fixture
When installing a ventilation system, the location of your fixture is just as important as the system you choose. This specific area is referred to as the “critical distance.”
It involves calculations based on factors such as the size of your pipes, the type of fixture, and the number of wet-vented fixtures in your home.
To ensure you’re doing it right, it’s smart to talk to a plumbing inspector after you measure your pipes. They can give you all the information you need to properly vent your pipes and comply with local codes.
Installing the Vent
Vent pipes don’t have to slope as drain pipes do. You can run them level, but make sure there are no obstacles. The goal is to keep the vent pipes dry, so most diagrams show them running vertically to avoid any water backups.
The only exception is the re-vent, which runs horizontally but must be at least 6 inches above the fixture’s flood level to stay dry.
A Note on the Main Drain
When installing your vents, it’s important to plan your drain lines to prevent clogging. Kitchen drainpipes (1-1/2 inches) and bathroom drainpipes (1-1/4 inches) are smaller than the rest of the system on purpose. They connect to larger branch drain pipes that lead to the 4-inch stack.
The main stack is vertical, so clogging is rare. The pipes connecting the stack should be horizontal and larger to allow water to flow easily. This is also a good time to have a professional inspect your main drain line, which is underground, to make sure it’s clog-free.
Plumbing Diagrams Made Easy
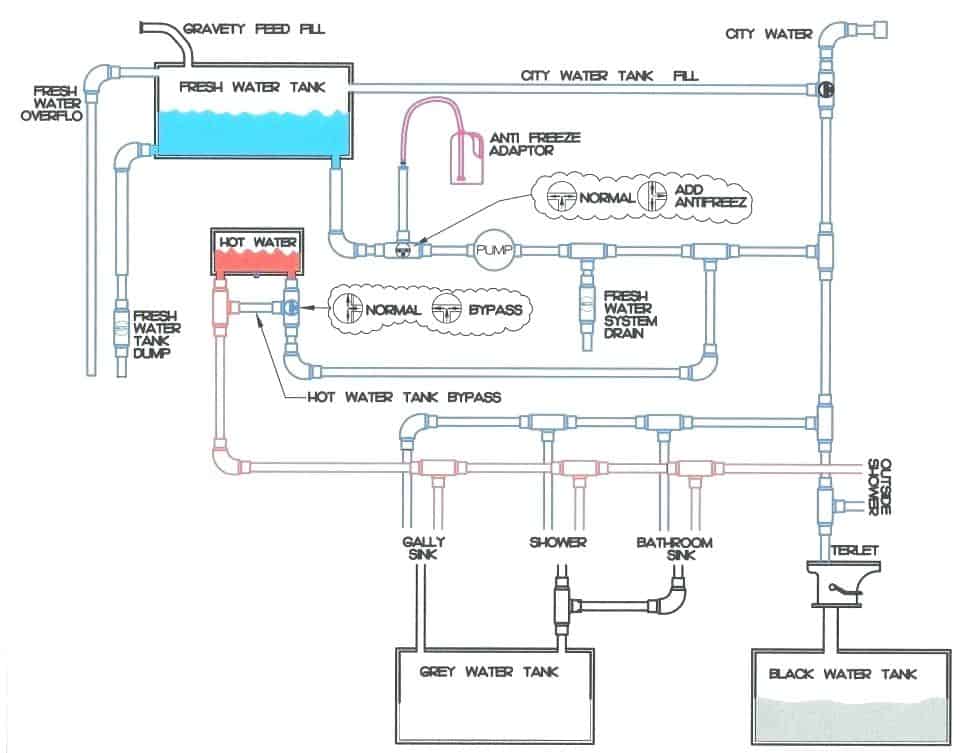
We’ve included a few diagrams to help you understand what a plumbing vent system looks like. The first one shows a typical bathroom with multiple vents, including one that connects to the bathtub.
You can see that the main vent is lined up with the stack near the toilet, but the sink is further away, so an extra vent (called a re-vent) was added to make sure the sewer gases can escape.
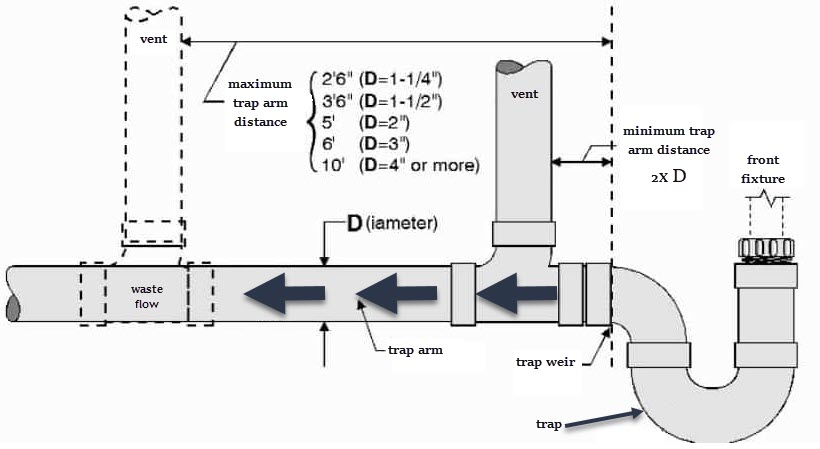
The next diagram showcases different types of vent piping behind a sink, so you can pick which one is best for your home. It shows the loop vent, which you may need to use if your sink is far from the stack.
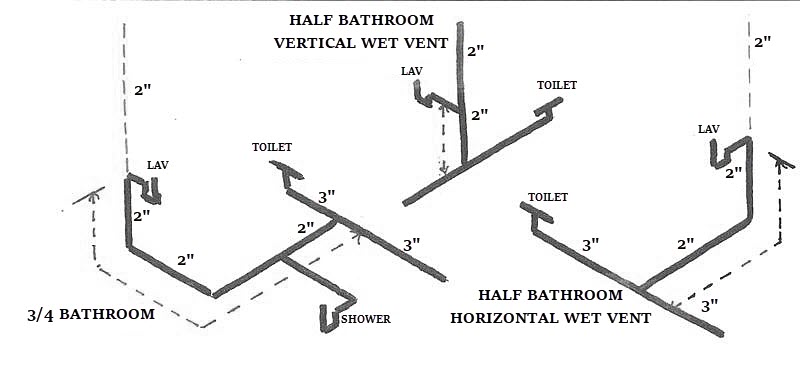
It also displays the sanitary cross, which you’ll need if you have a sink on the other wall. Both sinks use a common vent to the stack.
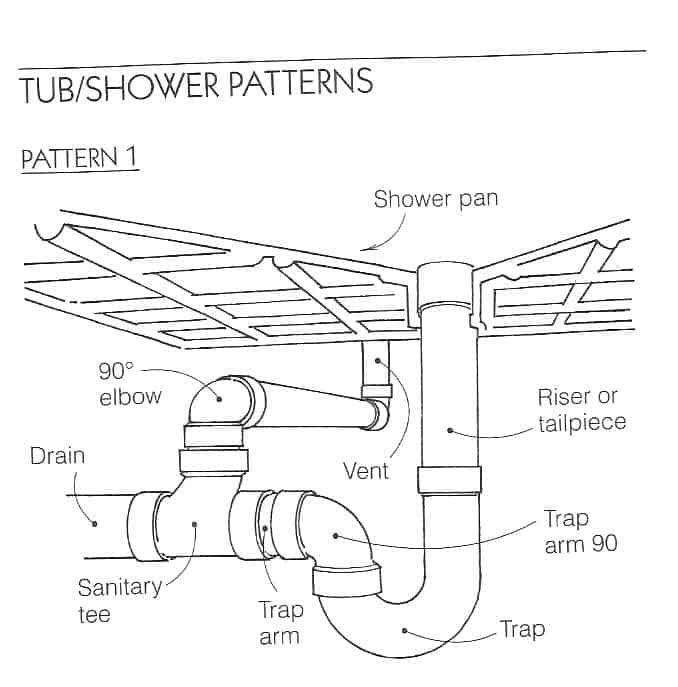
And finally, a side-angle view makes it easy to imagine what the pipes might look like in your bathroom or kitchen. You can see that the main vent and waste pipe are separated behind the sink and only connect through the re-vent pipe.
This re-vent is at least six inches above the overflow line and properly connected with a drainage T.
Check Out the Air Admittance Valve
If your walls don’t have enough space for a traditional vent pipe, there’s a fantastic solution called the Air Admittance Valve (AAV). This special valve lets air in when your plumbing has negative pressure from draining.
And then, when it’s done, it seals itself tight again to keep any bad smells or gases out. You can usually find these valves under the sink, past the trap, to ensure air can get in your pipes.
But before you use an AAV, it’s important to check with your local plumbing inspector to make sure it’s allowed by code.
Frequently Asked Questions About Venting Your Pipes
What happens if the plumbing is not properly vented?
Have you ever wondered why water gurgles down the drain or why there’s a strange smell coming from the bathroom? These could be signs that your plumbing system is not properly vented.
When water rushes down the drain, it creates a vacuum that pulls air from nearby pipes. That’s where a venting system comes in handy. It helps equalize the pressure in the drain line by allowing air in and preventing water from sucking the air out of the P-traps.
So, if you want to avoid gurgling drains and unpleasant odors, ensure your plumbing system is properly vented!
What clogs a plumbing vent?
Think of the plumbing vent as a chimney for your pipes. Just like a chimney, the vent opening on your roof is exposed to the outside elements. So, it’s no surprise that dirt, leaves, and other debris can block the opening and cause problems.
If this happens, you may notice tell-tale signs that it’s time to unclog your plumbing vent.
Where is the plumbing vent located?
They’re usually found on the roof, far from windows, for a very important reason. The plumbing vents ensure all the nasty fumes exit your home and fresh air enters your plumbing system. This fresh air helps water flow easily through all the fixtures in your home, like toilets and sinks, so everything stays working smoothly.
How high should a vent pipe be?
According to the plumbing code, the vents should reach 12 inches above the roof surface. This helps to stop snow from blocking the vents and causing problems. But, the higher the vent, the more likely it is to become clogged with frost – so it’s a delicate balancing act.
Does the shower need a vent?
The plumbing in your home needs proper ventilation to keep it functioning smoothly. This is especially important for pipes in the bathroom, like toilets, sinks, and showers.
The right ventilation helps prevent blockages and protects the drain pipe’s trap. It also saves you money, time, and potential damage to pipes and fittings.
Can a clogged vent pipe make you sick?
Sewer gas backup can cause serious illnesses, making it a priority for homeowners to be aware of the proper safety measures they should take.
It’s important to keep your sewer vents clear during these colder months otherwise, you risk breathing in unhealthy and hazardous gases. Clogged vents are one of the leading causes of sewer gas contamination, so don’t let them make you or your family sick.
Make sure to review preventative solutions to stay safe and healthy during these winter months.
Can I vent the plumbing out of the wall?
If you want to ensure that your sewer vent is up to par, make sure it follows these guidelines. Your sewer vent should not be located directly underneath a door, window, or any other air intake opening of your building or a neighboring building.
It should also be at least 10 feet away horizontally from these openings unless placed 3 feet above them. Additionally, your sewer vent should be a minimum of 10 feet away from the property line.
By following these criteria, you can guarantee a properly functioning sewer vent.
Final Thoughts
And that’s it! You’re now an expert on the subject of sewage pipe ventilation. With this newfound knowledge, you’re ready to tackle any renovation project that involves these pipes.
Just remember to choose the best ventilation setup based on your fixtures’ location, and always refer back to these helpful diagrams for guidance.
With these tips in mind, you’re sure to set up your vents with precision and accuracy.


