
Installing drywall can be challenging, particularly for beginners in DIY home projects or small construction tasks.
However, a drywall lift can significantly ease and speed up this process.
This guide offers a straightforward method for using a drywall lift to hang drywall, aiming for an installation that is smooth, safe, and efficient.
Understanding the Basics of Drywall and Lifts
Before exploring how to use a drywall lift, it’s essential to understand both drywall and the role of lifts in construction.
Drywall, also known as gypsum board, plasterboard, or sheetrock, is a panel consisting of gypsum mixed with additives, encased in paper.
It’s a popular choice for building interior walls and ceilings because of its fire resistance, ease of installation, and cost-effectiveness.
A drywall lift is a tool designed to hold and elevate drywall panels to ceilings or high walls, streamlining the installation process.
It’s often possible to operate a drywall lift single-handedly or with minimal assistance.
One notable example of such a tool is the Ironton Drywall and Panel Hoist.
This specific lift has several features and technical details that make it particularly efficient for construction tasks:
Features of the Ironton Drywall and Panel Hoist
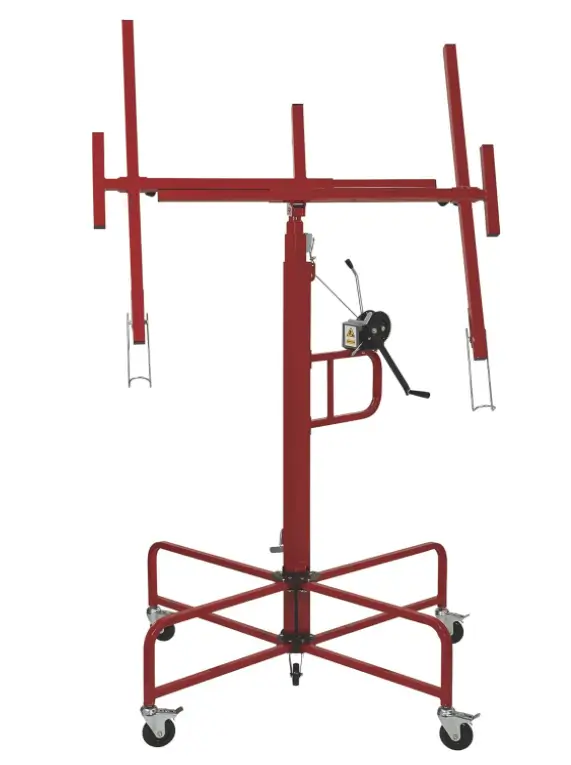
Courtesy Amazon
- Strong Powder-Coated Steel Frame: Ensures durability and resistance to corrosion, capable of handling heavy loads.
- Single Operator Use: Designed for easy operation by one person, capable of hoisting and moving panels up to 4ft. x 16ft.
- 150-lb Capacity: Allows for lifting multiple panels simultaneously.
- Locking Outriggers: These provide stability during heavy lifting tasks.
- 4 Smooth-Rolling Casters: Facilitate easy movement around the workspace.
- Automatic Load Holding Brake: Enhances safety by securing the load during use.
- Easy-to-Use Control: Simplifies the lifting and lowering of panels.
The technical details of the Ironton Drywall and Panel Hoist include an 88.8-pound weight and dimensions of 110 x 67 x 56 inches.
Manufactured by Ironton, this model (number 38402) is red and operates via a crank mechanism. The unit includes all necessary components for operation.
With tools like this, installing drywall becomes a more manageable task, often requiring minimal assistance.
Step-by-Step Guide to Using a Drywall Lift
- Assemble the Lift: Assemble your drywall lift according to the manufacturer’s instructions. Ensure all parts are securely fastened, and the lift is stable.
- Prepare the Drywall Panel: Measure and cut your drywall panel to fit the space you are working on. It’s important to be precise in your measurements to ensure a snug fit.
- Positioning the Panel on the Lift: Carefully place the drywall panel on the lift. Most lifts have a cradle that holds the panel in place. Ensure the panel is secure and balanced on the lift.
- Lifting the Panel: Using the lift’s mechanism, usually a wheel or crank, gently lift the panel towards the ceiling. Go slowly to maintain control and ensure the drywall doesn’t slip.
- Positioning the Drywall: Once the panel is close to the ceiling, maneuver the lift so the drywall is exactly where it needs to be installed. Make sure it aligns perfectly with the framing.
- Securing the Drywall: Start securing the drywall to the framing using drywall screws. Begin from the center and work your way out towards the edges. This method helps in preventing the drywall from warping or buckling.
- Lowering the Lift and Moving to the Next Panel: Carefully lower the lift and remove it after the panel is securely attached. Proceed to the next panel, repeating the process until all areas are covered.
Tips for a Successful Drywall Installation Using a Lift
- Safety First: Always prioritize safety. Wear protective gear like gloves, safety glasses, and a hard hat.
- Quality Drywall Screws: Invest in quality drywall screws to ensure a firm hold. The correct size and type of screw will prevent issues like popping out or damaging the drywall.
- Measure Twice, Cut Once: This adage holds. Accurate measurements are key to a successful installation.
- Smooth Finishing: After the drywall is installed, focus on finishing. This includes taping, applying joint compound, and sanding for a smooth surface.
Frequently Asked Questions About Hanging Drywall Using a Lift
How much weight can a typical drywall lift handle?
- Most standard drywall lifts can handle weights up to 150 pounds, which is sufficient for the majority of drywall panels used in residential construction. It’s important to check the specifications of your particular lift model to ensure it can support the weight of your drywall.
Can drywall lifts be used for ceilings higher than 8 feet?
- Yes, many drywall lifts are designed to reach ceilings higher than 8 feet, with some models capable of extending up to 11 to 15 feet. If you’re working with particularly high ceilings, look for a lift model that specifies an extended reach.
Is it possible to use a drywall lift for walls, or is it just for ceilings?
- Drywall lifts can undoubtedly be used for installing drywall on walls. They are versatile tools that can be adjusted for various angles, making them suitable for ceiling and wall installations.
Do I need a helper when using a drywall lift, or can it be a one-person job?
- One of the main advantages of using a drywall lift is that it can make hanging drywall a one-person job. However, having a helper can be beneficial for tasks like positioning the drywall onto the lift and ensuring everything is aligned correctly during installation.
How do I maneuver a drywall lift in tight spaces or corners?
- Maneuvering a drywall lift in tight spaces requires careful handling. Most lifts have casters that allow for smooth movement. When approaching tight corners, move slowly, adjust the panel’s angle as needed, and be mindful of the surrounding area to avoid damaging the drywall or the lift.
Conclusion
Using a drywall lift simplifies the installation process, turning a challenging task into a manageable one.
With the correct tools and methods, you can achieve high-quality results.
Focus on careful preparation and patience to master the technique of hanging drywall using a lift, resulting in a durable and visually pleasing outcome.
This skill is valuable for both experienced DIYers and beginners, enhancing your home improvement abilities for future projects.
If you have any thoughts or experiences with drywall lifts, please share them in the comments below.


