Proper drywall installation is a cornerstone of quality building and renovation projects. It affects not only the aesthetics of a room but also its structural integrity. However, homeowners and contractors often face a common problem: should you start with the walls or the ceiling?
This decision can have a lasting effect on the ease of installation, the project’s timeline, and the finished look. Multiple factors, including the room’s dimensions, the installer’s skill level, and the tools available, play a critical role in this decision-making process.
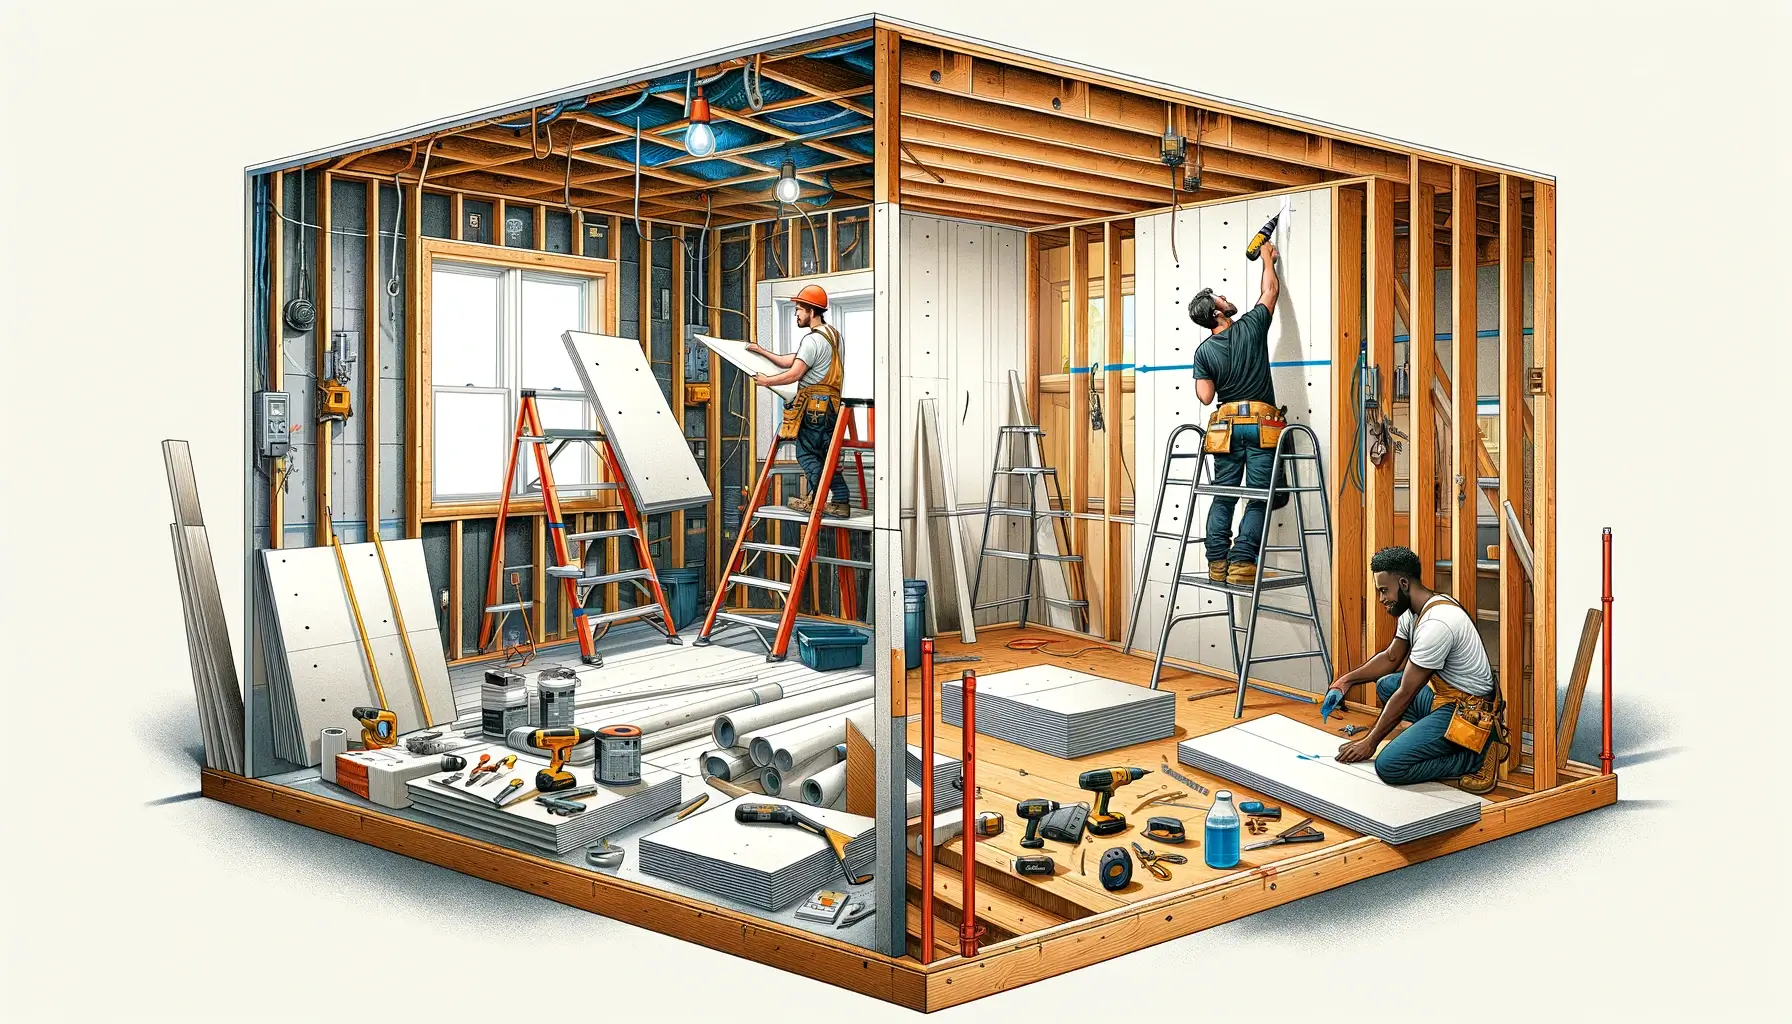
Understanding Drywall Installation Basics
Drywall, also known as plasterboard or gypsum board, is a staple in modern construction. Its prevalence is owed to its cost-effectiveness, ease of installation, and fire resistance.
From creating walls in a new home to adding partitions in a renovation, drywall is the go-to material for quickly defining spaces.
The key components of drywall installation include the drywall sheets, joint tape, joint compound, screws, and drywall lift or jacks for the ceiling panels.
Precision and patience are vital, as how these elements come together determines the room’s appearance.
The typical process of drywall installation unfolds in a step-by-step sequence:
- Preparation: Gather all tools and materials, and prepare the workspace by clearing obstacles and ensuring the framing is ready.
- Measuring and Cutting: Measure the area where the drywall will go and cut the sheets to size, leaving a small gap for expansion.
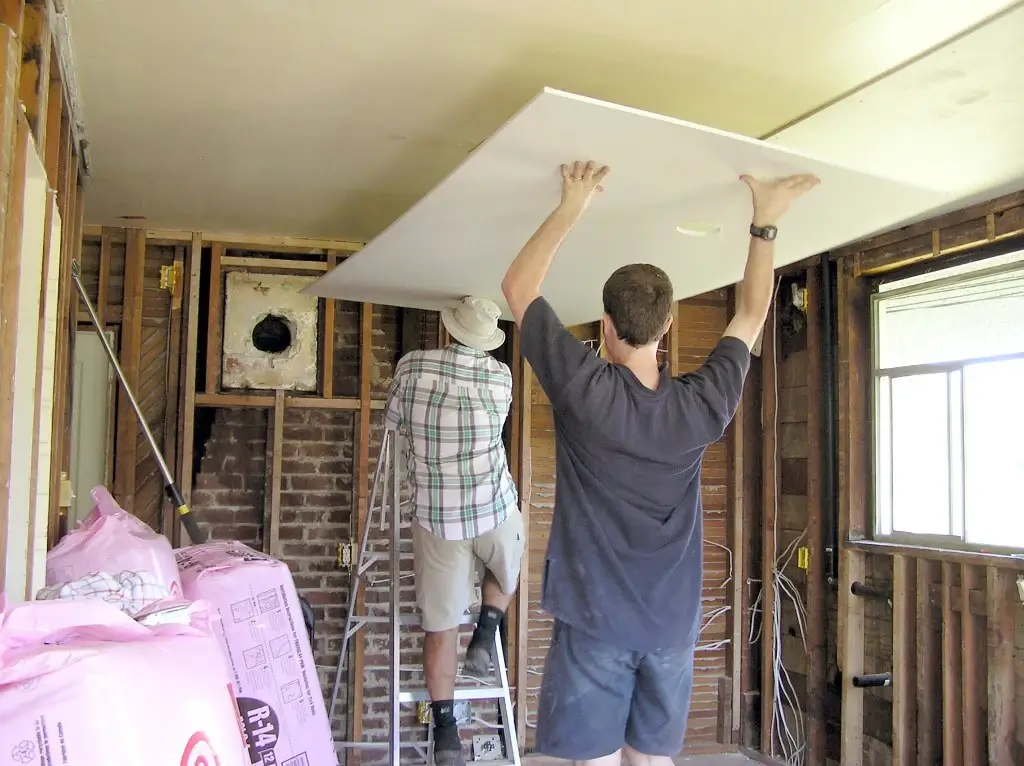
- Ceiling Installation: If starting with the ceiling, sheets are hoisted and screwed into the ceiling joists.
- Wall Installation: Wall sheets are then measured, cut, and installed, fitting them snugly against the ceiling drywall.
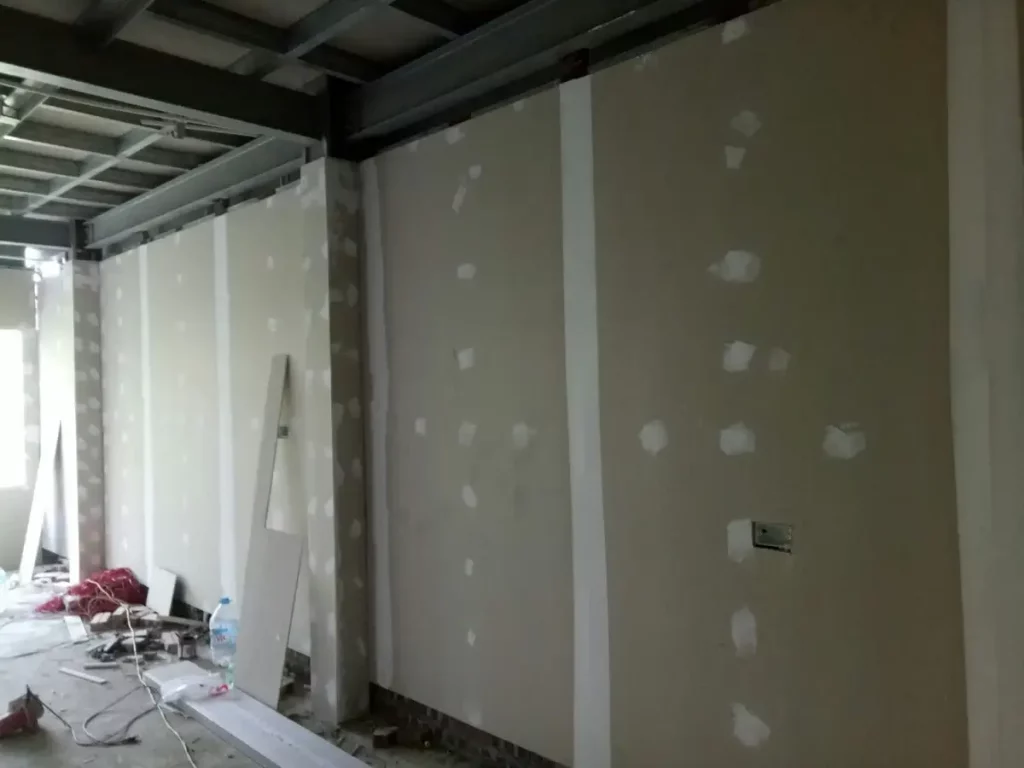
- Taping: Once the sheets are up, joints are taped using drywall tape.
- Mudding: Apply joint compound over the tape and screws, feathering it to create a smooth, seamless finish.
- Sanding: After the mud dries, the surface is sanded smooth.
- Finishing Touches: Any final touches, such as texture or primer, are applied before painting.
Each step requires precision, as errors can lead to more work in the finishing stages or even the need for repairs soon after the project’s completion.
Therefore, whether one starts with the ceiling or walls can significantly affect the workflow and finish.
The Traditional Method: Why Ceiling First Makes Sense
Historically, drywall installers have adhered to a tried-and-true approach: start with the ceiling. This practice dates back to the early use of drywall, replacing lath and plaster as a quicker and more economical option.
By tackling the ceiling first, installers take advantage of gravity, which helps to hold the wall panels against the ceiling, creating a tight joint that requires less mud and reduces the chance of cracking.
Structural reasons also make a compelling case for this method. Installing ceiling panels first provides a solid anchor for the wall panels.
It creates a supportive frame that walls can butt up against, which is especially crucial in spaces where the walls will bear weight or encounter more stress, like in garages or utility rooms.
Among the advantages:
- Stability: Ceiling panels locked in by wall panels are more secure.
- Alignment: Ensures straight and crisp lines where walls meet the ceiling.
- Reduced Seam Visibility: With the wall panels pushing up against the ceiling drywall, seams are less prominent.
- Efficiency: Simplifies the process, as gravity aids in holding the wall panels against the installed ceiling.
Ensuring a Seamless Finish
Starting with the ceiling sets the stage for a seamless finish. Since the ceiling is a continuous surface, any imperfections are likely to catch the eye.
By installing it first, you allow for a flat expanse without the obstruction of wall panels.
This not only aids in achieving a flawless surface but also simplifies the application of finishing touches.
To ensure a smooth transition between ceiling and walls:
- Apply a generous amount of joint compound to the gap between the ceiling and wall panels.
- Use a wide drywall knife to feather out the edges, blending the compound smoothly into the panel.
- Sand the corners with fine-grit sandpaper for a soft finish indistinguishable to the touch and eye.
- Consider a corner bead if the angles between walls and ceiling are sharp, which can create a more defined edge and further disguise any minor discrepancies.
With the ceiling securely in place and finished smoothly, the walls can then be addressed with the confidence that the most challenging part of the project has already set the standard for excellence.
Safety Considerations
When installing drywall, safety should never be an afterthought. Gravity plays a pivotal role not only in the efficiency of the installation but also in safety measures.
The weight of the drywall panels, particularly ceiling panels, can pose a risk if not managed properly. Dropping a panel could cause injury or damage to the underlying structure and the panels themselves.
The Role of Gravity in Drywall Installation Safety
Gravity can be both an ally and a challenge during installation. On the one hand, it can help fit panels tightly against the structural frame. On the other hand, improperly secured panels may shift or fall. Thus, understanding and respecting the role of gravity is critical to maintaining a safe installation environment.
Tools and Practices for Safe Ceiling Drywall Installation
- Drywall Lift: A drywall lift or jack can securely hold a ceiling panel. At the same time, it’s being fastened, reducing the physical strain on the installer and the risk of the panel falling.
- Proper Lifting Techniques: Using your legs to lift, keeping panels close to the body, and avoiding twisting motions can prevent personal injury.
- Adequate Fastening: Ensuring that screws are properly spaced and driven into the ceiling joists or rafters can prevent panels from slipping or falling.
- Teamwork: It is often advisable to work with a partner when maneuvering large or awkward panels, which helps distribute the weight and provides immediate assistance if a panel starts to slip.
- Personal Protective Equipment (PPE): Wearing safety glasses, a hard hat, and steel-toe boots protects against potential head and foot injuries from falling objects.
- Scaffolding and Stilts: For higher ceilings, scaffolding provides a stable platform, while stilts allow for easier movement around the room at an elevated height.
- Clear Work Area: Keeping the work area free of debris and clutter reduces the risk of trips and falls.
Incorporating these tools and practices into your installation process is not just about preventing accidents.
It’s also about ensuring the job can proceed smoothly without interruptions due to injuries or the need to repair work damaged or done poorly due to safety oversights.
A safe job site is an efficient one where the focus can remain on the quality of installation.
The Walls-First Approach: Is It Ever Viable?
The prevailing wisdom suggests ceiling before walls, but there are certain scenarios where a walls-first approach may not only be viable but preferable.
For example, in smaller projects or repairs where only one wall needs attention, it can be more practical to install wall drywall first.
Additionally, in rooms with complex ceiling designs or where ceilings are non-standard in their construction, addressing the walls initially might provide a better framework upon which to design and install the ceiling.
The benefits of doing the walls before the ceiling include:
- Flexibility: In complex designs, it allows for more creative and structural flexibility with the ceiling.
- Accessibility: It may be easier to access and secure the top of the wall panels without the ceiling in place.
- Individual Preferences: Some contractors or DIYers prefer this method based on their personal experiences or the project’s specifics.
Innovative Methods and Tools
Modern advancements have made the walls-first method more accessible. For instance:
- Adjustable Drywall Stilts: These allow installers to reach the upper edges of walls easily, which can be beneficial when walls are done first.
- Laser Levels: These can project straight lines onto the wall or ceiling, ensuring that even if walls are done first, the ceiling lines will match up perfectly.
- Panel Lifters: Portable lifters can help position wall panels snugly under ceiling joists, ready to be fixed into place.
Technology is continuously evolving, and as it does, it refines and sometimes reinvents the approach to traditional construction practices, including drywall installation.
Case Studies: When Walls Came First
There are real-life examples where installing walls before ceilings has proved successful:
- Historic Renovations: In a project involving a historic building, contractors chose to do the walls first to ensure they did not disrupt the integrity of the uniquely designed ceilings.
- Custom Builds: A custom home with vaulted ceilings saw walls installed first to allow for precise measurements and cuts for complex ceiling angles.
- Commercial Spaces: In a commercial office fit-out, walls were erected before the drop ceiling to accommodate the specific design requirements and integrated technology systems.
In each case, the decision to start with walls did not compromise the quality or safety of the installation, demonstrating that while ceiling first is conventional wisdom, walls first can be just as viable given the right circumstances and expertise.
Comparing Ceiling-First and Walls-First Techniques
Regarding drywall installation, both ceiling-first and walls-first techniques have their advocates. The choice between the two often depends on specific project parameters, the desired outcome, and the installer’s experience.
A detailed comparison requires looking at factors such as the complexity of the project, the structure’s design, and the conditions of the installation site.
In general, ceiling-first is seen as the standard for most installations, especially in straightforward, new construction scenarios.
On the other hand, walls-first might be considered for specialized projects or when working around unique architectural features.
Situational Analysis: When to Use Which Technique?
- Ceiling-First: Recommended in most standard residential and commercial constructions.
- Walls-First: More suitable for intricate ceiling designs or when working in a confined space.
Pros and Cons: A Comprehensive List
Ceiling-First Advantages:
- Stability: Ceiling panels support the upper edge of wall panels.
- Seamlessness: It is easier to achieve a seamless finish where the wall meets the ceiling.
- Standard Practice: More familiar to most installers, which can lead to a faster installation.
Ceiling-First Disadvantages:
- Accessibility: Once the ceiling is up, it may be harder to manipulate full wall panels into place without damaging the ceiling drywall.
Walls-First Advantages:
- Flexibility: Allows for more precision in custom ceiling designs.
- Innovation Friendly: Modern tools and methods can accommodate and enhance this approach.
Walls-First Disadvantages:
- Risk of Gaps: It is potentially more difficult to achieve a tight fit at the joint between the wall and ceiling, leading to finishing challenges.
- Less Common: Fewer examples to follow, which may result in a learning curve for installers.
Expert Opinions
Consulting with seasoned construction professionals provides valuable insights into the best practices for drywall installation. For instance:
John Doever, a master builder with over 30 years of experience, asserts that “the ceiling-first method remains dominant because it provides a structural blueprint for the walls and helps minimize seam cracking over time.”
Jack Smith, a contemporary architect known for her innovative interior designs, argues that “walls-first can be advantageous in complex designs where the ceiling is not just a flat surface but a design element in itself.”
These insights underscore the notion that the order of drywall installation is not a one-size-fits-all choice but should be adapted to the specifics of the construction project.
What the Industry Standards Say About This Query
Various authoritative bodies establish industry standards in construction. They are often based on longstanding practices that have been tested and refined over time.
Regarding drywall installation, these standards typically favor the ceiling-first approach.
This preference is largely due to the structural and practical benefits that this method provides, which have been detailed in numerous construction manuals and building codes.
- Building Codes: Often reference the ceiling-first method to ensure stability and a cleaner finish.
- Trade Associations: Organizations like the Gypsum Association often publish guides that implicitly recommend the ceiling-first technique by the way they instruct on joint taping and finishing.
- Manufacturer Guidelines: Drywall manufacturers might provide specific instructions that align with the ceiling-first method to ensure the best performance of their product.
The Impact on Repairs and Renovations
The initial order of drywall installation can have significant implications for future modifications and renovations.
- Ease of Modification: Ceiling-first installations may be easier to modify because the wall panels can be removed without disturbing the ceiling.
- Seam Repairs: If the drywall was installed walls-first, repairs at the juncture of walls and ceiling might require more work to ensure the ceiling is not compromised.
- Renovation Readiness: Ceiling-first can make future renovations more straightforward, as it’s typically easier to match new wall drywall to an existing ceiling than vice versa.
Real-life Examples of Renovations Based on Initial Drywall Installation Order
Real-life renovation projects can illustrate the long-term impact of the chosen drywall installation order:
- Historic Home Renovation: In one case, a historic home with ceiling-first drywall required less structural reinforcement during a major renovation, making it easier to preserve original features.
- Commercial Upgrade: A commercial space that had walls-first drywall faced additional costs and complexities when upgrading its HVAC system, as more extensive ceiling work was required to accommodate the new ductwork.
- Modernization Project: In a modernization project, a home with ceiling-first installation allowed for the easier integration of smart home technology and lighting without disturbing the integrity of the walls.
These examples highlight that while the ceiling-first method may be the industry standard due to its numerous practical benefits, the best approach always depends on the specific circumstances and future needs of the property.
Tips for DIY Enthusiasts and Professionals
Navigating the drywall installation process can be daunting for DIY enthusiasts and seasoned professionals.
Here are some pointers to help make the decision on installation order simpler and the process smoother.
Step-by-Step Guide for Deciding the Installation Order
- Assess the Scope: Determine the size and complexity of the project.
- Inspect the Space: Look for architectural features that may influence the installation order.
- Consider the Design: If you’re working with complex designs or custom features, plan how these will impact the installation.
- Evaluate Expertise: Honestly assess your skill level or consult with professionals if necessary.
- Prepare the Area: Ensure the space is clean and ready for installation, regardless of the method chosen.
- Gather Materials: Make sure you have all the materials and tools you’ll need before beginning.
- Plan the Sequence: Decide the installation order based on the assessment and preparation steps.
- Implement Safety Measures: Take all necessary precautions to ensure a safe installation process.
- Begin Installation: Follow the planned sequence, maintaining quality and precision.
Tips for Both Novice DIYers and Seasoned Professionals
- Start Small: If you’re new to drywall, start with a small project or a single room to hone your skills.
- Measure Twice, Cut Once: This saying remains critical in drywall installation.
- Invest in Quality Tools: High-quality tools can make the job easier and more efficient.
- Don’t Rush the Job: Take your time to ensure the best finish, especially at joints and angles.
- Seek Guidance: Professionals should stay updated with the latest codes and standards, while novices shouldn’t hesitate to ask for help or hire a professional if a project is too complex.
Time Management in Drywall Installation
The order of installation has a direct impact on the project’s timeline.
How the Order of Installation Affects Project Timelines
- Ceiling-First: This approach may streamline the process, as walls can be more quickly aligned and secured.
- Walls-First: This might require additional time for precision work, especially if the ceiling will have a complex design.
Strategies to Optimize Time Without Compromising Quality
- Pre-Planning: Thoroughly plan the project to anticipate and mitigate potential delays.
- Batch Tasks: Organize tasks to minimize downtime, such as cutting all panels before starting to install any.
- Use Drywall Tools: Utilize lifts and supports to make the installation faster and less labor-intensive.
- Work in Teams: Having more hands on deck can significantly speed up the process while maintaining a high standard of work.
The Right Tool for the Right Order
Using the correct tools is essential for efficient and quality installation, whether you’re going ceiling-first or walls-first.
Specific Tools That Facilitate Ceiling-First or Walls-First Approaches
- Ceiling-First: A drywall lift or jack is invaluable, allowing a single person to install ceiling panels securely.
- Walls-First: Drywall stilts and laser levels can help in achieving precision and speed when walls are done before ceilings.
- General Tools: T-squares, utility knives, and power drills with screw-setting bits are essential regardless of the method chosen.
Proper tool selection can make a significant difference in the ease and outcome of the project.
Decision-Making Framework
Factors to Consider Before Making a Decision
- Project Type: New construction vs. renovation can significantly influence the preferred method.
- Ceiling Complexity: Complex ceiling designs might necessitate a walls-first approach.
- Structural Requirements: Some buildings may have specific structural needs that dictate the order.
- Installation Environment: The height of the ceilings, the presence of scaffolding, and the room layout could all impact the decision.
- Material Handling: The size and weight of drywall sheets might affect how easily they can be maneuvered into place.
- Skill Level: A DIYer’s expertise might lean towards a simpler approach, whereas a professional might handle more complex orders.
- Tools and Equipment: Availability and familiarity with specialized tools can sway decisions.
- Time Constraints: Tight timelines might be better suited to the most efficient method.
- Budget: Some methods may require more labor or special tools, affecting the project cost.
- Safety: Consider which method promotes a safer work environment to minimize risk.
A Checklist for Construction Managers and DIYers
- Assess the Space: Measure and inspect the area to understand the scope of work.
- Review Design Plans: Study any architectural plans or design intentions closely.
- Consult Building Codes: Ensure your plan adheres to local regulations and standards.
- Consider Material Sizes: Match the drywall sheet sizes to the dimensions of the space.
- Check Equipment Availability: Ensure you have access to the necessary tools.
- Evaluate Skill Sets: Align the project with the capabilities of the team or individual.
- Plan for Waste Management: Think about how waste materials will be handled.
- Establish Safety Protocols: Set up the work area to prevent accidents.
- Create a Timeline: Develop a schedule that considers all installation steps.
- Budget Accordingly: Account for all potential costs, including materials and labor.
- Prepare for Installation: Acquire materials, ready the site, and brief the team.
- Decide on the Order: Based on the previous factors, choose the method that aligns best with the project’s needs.
- Monitor the Installation: Whether DIY or professional, oversee the work to ensure it follows the plan.
- Quality Check: Inspect the work at various stages to maintain high standards.
Sticking to this framework can help construction managers and DIYers make informed decisions that lead to efficient and successful drywall installations.
The checklist provides a structured approach to planning and executing the project, helping to ensure that nothing is overlooked.
Final Recommendations on Deciding the Order of Drywall Installation
Given the complexity and variability of construction projects, there isn’t a one-size-fits-all answer to whether to drywall the ceiling or walls first.
However, the following recommendations can guide you towards making an informed decision:
- For most residential projects, the ceiling-first method is recommended to ensure structural integrity and ease of installation.
- In cases of high ceilings, intricate designs, or unique architectural features, a walls-first approach may be justified.
- Always consider the specifics of your project, including design, structural requirements, and personal capability, before making a decision.
- Safety should always be a top priority, dictating the techniques and tools used for the installation process.
- Regardless of the chosen method, using the right tools and techniques is critical for a smooth and successful drywall installation.
In conclusion, deciding whether to start with the ceiling or walls when installing drywall should be made after carefully considering all the factors discussed.
By following the guidelines and recommendations provided, you will be well-equipped to execute a drywall installation that is both structurally sound and aesthetically pleasing.


