When setting up a new toilet, one important aspect you need to remember is the toilet’s rough-in size. While it may not sound like a fancy term, it is crucial in ensuring that your toilet fits perfectly and functions as intended.
What Is a Toilet Rough-In?
If you’re thinking of getting a new toilet, make sure to take the time to measure your toilet rough-in. This is the distance between the back wall and the center of your toilet drainpipe, and it’s essential for making sure that your installation goes smoothly. Knowing your rough-in will ensure that your chosen toilet fits perfectly in its place.
An accurate measurement of your rough-in size will help you avoid problems during installation, such as leakages or blockages in the drainpipe.
Why Is a Toilet Rough-In So Important?
A correct rough-in size ensures that your toilet fits perfectly when installed. If you don’t get an accurate measurement of your toilet’s rough-in size, you may end up with several issues, including having your tank too close or too far from the wall, making it difficult for you to install it properly. It could also lead to plumbing problems if not measured correctly.
How to Accurately Measure Toilet Dimensions (Inches)
When it comes to plumbing, getting the measurements right is key. Knowing accurate toilet rough-in dimensions can be the difference between a successful installation and an expensive remodeling project.
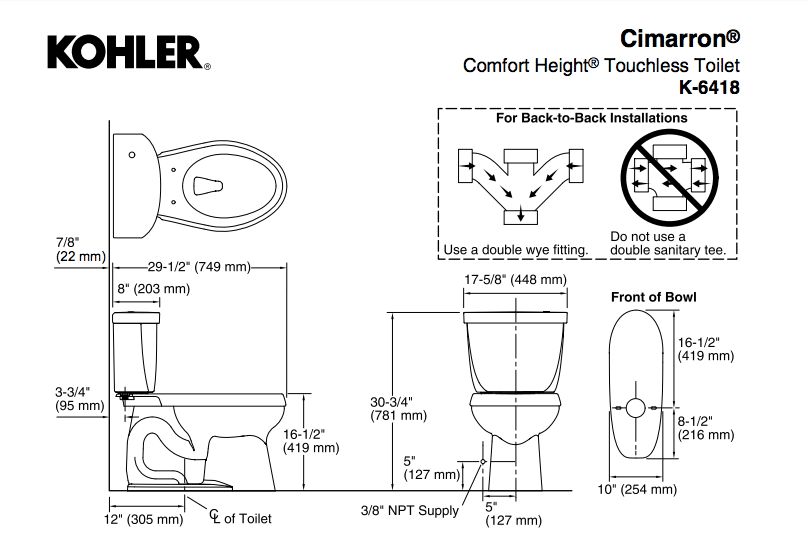
You should be aware of three main measurements for toilets: 10-inch, 12-inch, and 14-inch rough-in. Here’s everything you need to know about each one.
10 Inch Rough- In Toilet
These toilets are compact and have a round front. They are ideal for small bathrooms where space is limited. If your bathroom is small or older, it will likely have a 10-inch rough-in toilet.
12 Inch Rough-In Toilet
A 12-inch rough-in toilet is the most common size found in most bathrooms. It’s the standard size, but you should measure it twice before buying a new toilet to avoid any issues. This site offers the most flexibility regarding the toilet bowl’s shape and the toilet style you purchase.
14 Inch Rough-In Toilet
Although your options will be limited, you still have some variety when looking at toilets. If your bathroom is older, it may have a 14-inch rough-in toilet. This size is less common than the 10 and 12-inch toilets but still exists in older homes.
What You Need To Know To Get Started
Installing a toilet is simple as long as it’s done with the proper preparation. Plan ahead and take accurate measurements multiple times to ensure your results are correct. This will save you time and avoid any potentially costly mistakes in the future.
Distance of Toilet Flange from Back Wall
The toilet flange distance from the wall, also known as a closet flange, connects the toilet drain to the drain pipe and should be carefully considered during installation.
When constructing a new wall, the distance from the middle of the flange to the wall framing should be at least 15 ½ inches. In cases where a finished wall already exists, this distance is usually around 12 inches.
Getting these measurements right before beginning installation can save you from a lot of trouble in the long run.
Necessary Clearance on Left and Right
Installing a toilet in a small bathroom can be tricky – you want to ensure functionality and comfort. Be sure to leave at least 15 inches of space on either side of the toilet’s centerline. It doesn’t matter if there is a wall or a bathtub on one side.
15 inches is the minimum requirement. Additionally, remember to leave at least 21 inches from the front of the toilet to the walls or fixtures.
Free Space Needed in Front of Bowl
Small bathrooms can often be tight on space and comfort. But there are a few things you can do to maximize the area. When installing a toilet, ensure the distance from the wall or other fixture in front of it is at least 21 inches – the more room, the better, but don’t go any lower.
You might want to consider getting a round-shaped bowl, which will fit better in a small bathroom than an elongated one.
Where To Place Cold Water, Supply Line
If you’ve noticed water leaking around your toilet, it’s likely time to replace the water supply line. This is an important job that needs to be done correctly, or you could end up wasting water and damaging your bathroom.
Before starting, ensure the main water supply is turned off, and position a bucket to catch any spilling water. The typical supply line consists of two lines: one for cold water and one for hot. They’ll be made with either a half- or three-quarter-inch copper tubing and come out of the wall or the floor. For intuition, it’s best to have them come out of the wall as it’s less noticeable.
When putting in the new lines, aim for six inches away from the flange on both sides — this will ensure they’re far enough away from any potential splashes or spills.
Once everything is set up, turn on the main valve slowly, so there are no sudden pressure changes in the system. Test your work by flushing a few times and checking for leaks.
How to Accurately Measure a Toilet Rough-in Without the Aid of an Existing Toilet
If you’re renovating your bathroom or installing a new toilet, it’s important to know the size of your toilet rough-in. The rough-in is the distance between the center of the drainpipe (toilet flange opening) and the bare wall behind the toilet.
This measurement will determine the size of the toilet you need to buy. Here are some steps to follow when measuring a toilet rough-in without having an existing toilet:
Step 1: Identifying the Drainpipe
The first step in measuring your toilet rough-in is identifying the location of the drainpipe on the floor. The drainpipe is the hole cut out of the floor where the toilet will be installed. It will typically have a white plastic lining called the toilet flange.
To locate the drainpipe, remove any flooring material covering the bathroom floor. If your floor is concrete, use a chisel to remove any high spots or bumps around the drainpipe.
If your floor is wood, you may need to remove some boards to access the drainpipe. Once you see the drainpipe, inspect it to ensure it is not damaged or corroded.
Step 2: Measuring the Rough-in
Once you have located the drainpipe, the next step is to measure the distance between the center of the drainpipe and the bare wall behind the toilet. This is known as the rough-in measurement.
The standard rough-in measurement for most toilets is 12 inches, but some toilets may require a 10-inch or 14-inch rough-in.
To measure the rough-in, start by placing the end of your measuring tape at the center of the drainpipe. Then, extend the measuring tape straight toward the wall until you reach the bare wall.
If your wall has a baseboard, raise your measuring tape to touch the bare wall above for a more accurate rough-in size.
Step 3: Check Your Work
Installing a toilet is an important task, and measuring the rough-in accurately is the first step. It’s vital to ensure that your measurements are correct, as you can’t fit a 12-inch flange in a 10-inch space! To double-check your work, remember that the tape measure should go to the center of the drainpipe opening—no more or no less. If you’re still unsure of your accuracy, it’s worth measuring again to confirm that everything fits properly.
You might be interested: 10 Easy Ways to Unclog a Toilet Fast: No Plumber Required
How to Measure a Standard Toilet Rough-In?
When installing a toilet, getting the right measurements is crucial. Knowing how to measure a standard toilet rough-in will save you time and effort.
Follow these step-by-step instructions for measuring the toilet rough-in:
- Measure the distance from the wall (not the baseboard) behind the toilet to the middle of the bolts on the toilet (closet bolts).
- Compare this measurement to the standard rough measurement of 12 inches from the center of the flange to the wall.
- If your measurement is not 12 inches, you’ll need to replace the toilet with the correct size for your space.
- Always measure against the wall for precision, and avoid measuring from molding (baseboard) to flange, as this will not produce an accurate result.
- If you have a four-bolt toilet, measure from the rear bolts to ensure accuracy. When possible, take measurements between the center of the flange and the wall for the best results.
How to Measure Toilet Flange Distance from Wall?
Have you ever wondered how to measure the distance between your toilet flange and the wall? Getting it right is super important so your toilet can fit in just right.
Here’s how you can do it:
- Measure the distance on each side of the toilet. Start by measuring at least 15 inches from the center of the flange (or the bowl) to the wall or fixture.
- If you don’t have a finished wall, add a half-inch to your measurement to account for the drywall’s thickness.
- Measure the distance from the front of the toilet to the wall or fixture in front of you. The distance will depend on your plumbing code, which can be confusing.
- If your plumbing code follows the IPC (International Plumbing Code), the measurement should be a minimum of 21 inches. If your code follows the UPC (Uniform Plumbing Code), the minimum measurement should be a minimum of 24 inches.
- When roughing in a water line, measure six inches to the left of the center of the flange and come up seven inches from the top of your finished floor. But if your floor is unfinished, you will need to consider the flooring material’s height.
There you have it! Follow these steps, and you’ll be able to confidently measure your toilet flange distance from the wall.
Frequently Asked Questions About Toilet Rough-In
Can you replace a 10-inch rough-in toilet with a 12-inch rough-in toilet?
While a 10-inch rough-in toilet is usually designed to fit into a 10-inch space, you can still successfully install it into one with a 12-inch rough-in. Although this may be possible, it’s important to remember that the two sizes don’t match perfectly. You must ensure all connections are properly sealed to prevent any issues. There are detailed online instructions that outline the process of installing a 10-inch toilet into a 12-inch rough-in space if needed.
Are higher or lower toilets better?
The higher bowl height can be good for the knees and back and offer actual advantages to taller people, the elderly, and people with motion problems—these toilets are extremely popular and widely used. But comfort height isn’t comfortable for everyone.
Are all toilets 12 inches from the wall?
If you already have an existing toilet installed, measure the distance from the wall to determine its rough-in size – this should be either 10 or 14 inches. Once you know your size, finding a replacement model with the same rough-in is important for easy installation.
Should a toilet touch the wall?
Toilets should never be touching the wall behind them, but it’s perfectly acceptable to have a gap up to 2-1/2 feet in between. This gap size ensures that the toilet has enough room for easy installation and doesn’t interfere with other plumbing fixtures connected to the wall.
How many inches is a comfortable height toilet?
If you’re looking for an ADA-approved toilet that offers more comfort to those with difficulty standing up from a low seat, such as the elderly or disabled, then a ‘comfort height’ toilet is likely your best option. Comfort height toilets measure between 17 and 19 inches, measuring from the floor to the seat – so make sure to speak with your plumber about your available options. Toilets with a 12-inch rough-in measurement are the most common, so you’ll have plenty of options if you purchase one.
Conclusion
Installing a toilet may seem challenging, but with the right preparation and materials, you can do it quickly and easily.
By following this Toilet Rough-In Guide, you now have the information you need to ensure that your rough-in is correct, resulting in an effective and secure toilet installation.
With these tips and your hard work, you’ll be enjoying your new toilet in no time.


