Have you ever walked into a room and felt instantly uplifted? That’s the power of a well-painted room.
Painting your own space isn’t just about changing colors. It’s about transforming your living environment into something that truly reflects who you are.
So, why should you consider diving into DIY room painting?
First, the joy and satisfaction comes from personalizing your space.
When you paint a room yourself, you’re not just applying color to walls but infusing the room with your own style and essence.
It’s an opportunity to express yourself, experiment with colors, and create an atmosphere that brings comfort and happiness.
DIY room painting also allows you to tailor your living space to your preferences and needs.
Whether you’re looking for a calm, relaxing bedroom or a vibrant and energizing living room, the right paint can make all the difference.
Plus, it’s a cost-effective way to refresh your home without expensive renovations.
The process of painting can be as rewarding as the final result. There’s something deeply satisfying about the act of transforming a room with your own hands.
As you paint, you’ll witness your space’s transformation and feel a sense of accomplishment and pride in your work.
Planning Your Painting Project
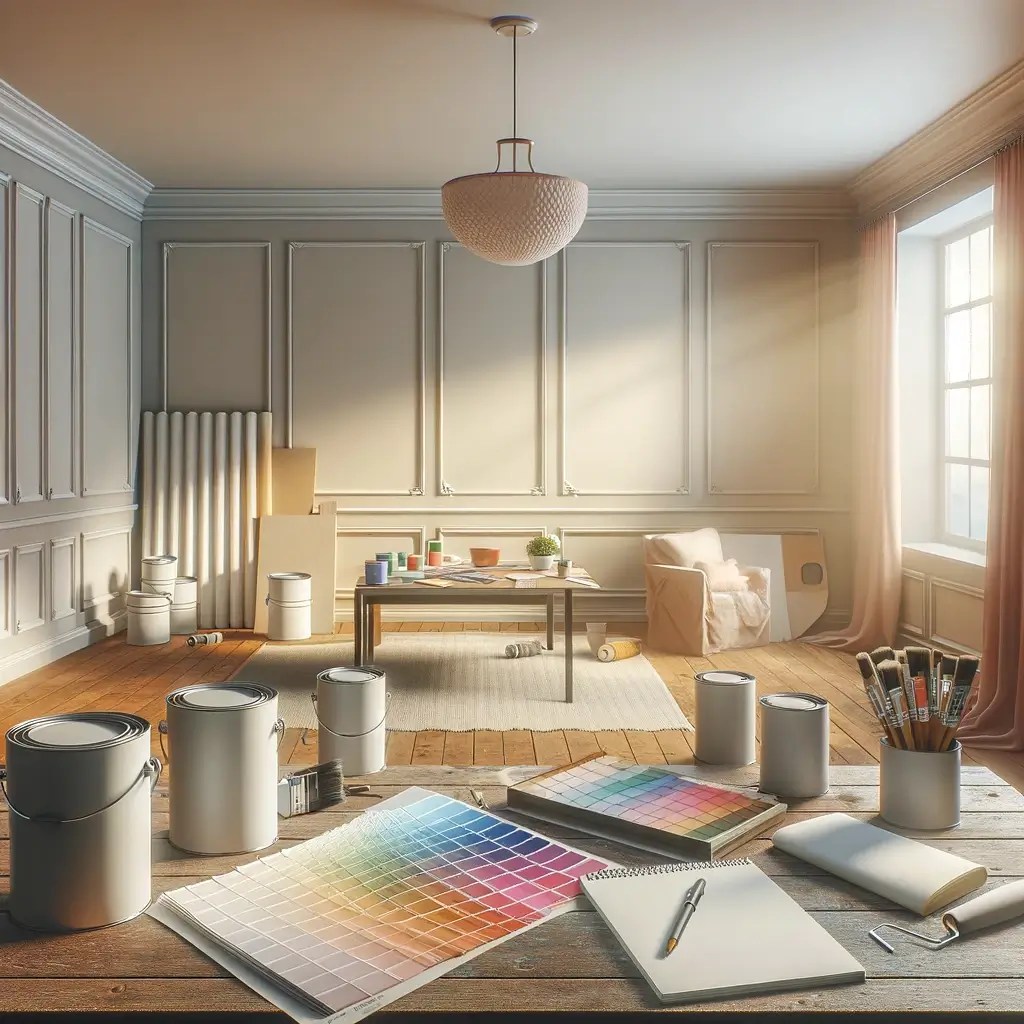
Starting a painting project is exciting but requires careful planning to ensure success. Here’s how to set the stage for a successful painting journey:
How to Begin: Setting the Stage for Success
- Define Your Vision: Start by imagining what you want your space to look and feel like. Consider the mood you want to create – whether it’s calm, energetic, cozy, or sophisticated.
- Assess Your Space: Take a good look at your room. Consider the natural light, the size of the room, and the existing furniture and decorations. These elements can influence your color choices.
- Gather Inspiration: Look at magazines, websites, and social media for color ideas and design inspiration. Create a mood board with your favorite ideas.
- Plan Your Budget: Determine how much you want to spend. Remember to account for paint, supplies, and any additional tools you might need.
- Measure Your Space: Knowing your room’s size helps estimate how much paint you’ll need. Measure the walls and calculate the square footage.
Selecting Paint Colors: What Suits Your Room Best?
- Consider the Room’s Purpose: Colors can greatly affect the mood of a room. For instance, blues and greens are calming and great for bedrooms. At the same time, vibrant colors like reds and oranges can energize a space like a kitchen or playroom.
- Think About Lighting: Natural light shows the truest color, while incandescent lighting brings out warm tones, and fluorescent lighting casts a sharp blue tone. Observe how different lights affect the color choices in your room.
- Test with Samples: Before committing to a color, buy sample paints to test on your walls. Observe the colors at different times of the day as lighting changes.
- Coordinate with Your Decor: Ensure your paint color complements your furniture, artwork, and fabrics. It doesn’t have to match perfectly, but it should harmonize with the elements in your room.
By carefully planning and considering these factors, you’ll set a solid foundation for your painting project and ensure the result is exactly as you envisioned.
Preparing the Canvas: Room and Wall Preparation
Before you start painting, preparing your room and walls is important. This preparation ensures a smooth painting process and a professional-looking finish.
Here’s a step-by-step guide to get your walls ready:
- Clean the Walls: Start by removing dust, dirt, and grease spots with a mild detergent and water. This step is essential for ensuring the paint adheres properly.
- Repair any Imperfections: Look for holes, cracks, or dents in the walls. Use spackle or a similar compound to fill these in. Once dry, sand the area until it’s smooth.
- Tape off Trim and Ceilings: Protect the areas you don’t want to paint, like window trims, door frames, and ceilings, using painter’s tape.
- Remove Outlet Covers and Switch Plates: This helps prevent paint from getting on them and makes for a cleaner look.
- Apply Primer: If your walls are significantly stained, or you’re making a drastic color change, applying a primer is a good idea. It helps cover imperfections and provides a uniform surface for painting.
For Furniture and Floor Protection, follow these tips:
- Drop Cloths: Lay drop cloths on the floor to protect it from drips and spills. Cloth drop cloths are better for floors, while plastic ones are ideal for covering furniture.
- Furniture Covers: If you can’t move furniture out of the room, cover it with plastic sheeting or old sheets.
- Tape and Plastic Sheeting: For larger pieces that can’t be moved, like cabinets or built-ins, use painter’s tape to attach plastic sheeting around them.
- Remove Valuables: Take out any valuable or fragile items from the room to prevent accidental damage.
- Ventilation: Keep the room well-ventilated during and after painting to protect your belongings from paint fumes.
Tool Time: Gathering Your Painting Arsenal
Having the right tools is essential for a successful painting project. Here’s a complete list of tools you’ll need for room painting:
- Paint: Choose the color and quantity based on your room’s measurements.
- Primer: Essential for covering imperfections and ensuring even paint application.
- Paint Brushes: Have a variety of sizes for different areas – small brushes for trims and corners and larger ones for broad surfaces.
- Rollers and Roller Covers: Rollers for larger wall areas and roller covers suited to your wall texture.
- Paint Tray: For holding and rolling out the paint.
- Painter’s Tape: To protect trim and edges you don’t want to paint.
- Drop Cloths: To protect your floors and furniture from drips and spills.
- Ladder or Step Stool: For reaching high places.
- Sanding Paper: To smooth out any wall imperfections.
- Spackle and Putty Knife: For filling in holes and cracks.
- Cleaning Supplies: Rags, sponges, and a mild detergent for prepping walls.
- Safety Gear: Gloves, masks, and possibly goggles for protection.
- Extension Pole: To extend the reach of your roller.
- Paint Can Opener and Stirrer: To open paint cans and stir paint.
- Bucket: For mixing paint, if you’re using more than one can to ensure color consistency.
Understanding and Choosing Paint Finishes
The finish of your paint is just as important as the color. The right finish can enhance the paint’s durability and affect the color’s appearance. Here’s a quick guide:
- Matte or Flat Finish: Provides a non-reflective, smooth appearance. It is ideal for hiding wall imperfections but is less durable and harder to clean.
- Eggshell Finish: It has a slight sheen and more durability than matte, making it suitable for moderate-traffic areas like living rooms.
- Satin Finish: Offers a bit more sheen than eggshell. It’s easy to clean and works well in high-traffic areas like kitchens and bathrooms.
- Semi-Gloss: Reflective and durable, it’s perfect for trim, doors, and areas that require frequent cleaning.
- High-Gloss: The most durable and easiest to clean. It’s very shiny and best used for highlighting details like trim and decorative molding.
Choosing the right paint finish depends on the room’s function, the amount of traffic it receives, and your personal style preferences.
Each finish offers unique benefits and affects the final look of your paint job.
The Art of Detailing: Trims and Edges
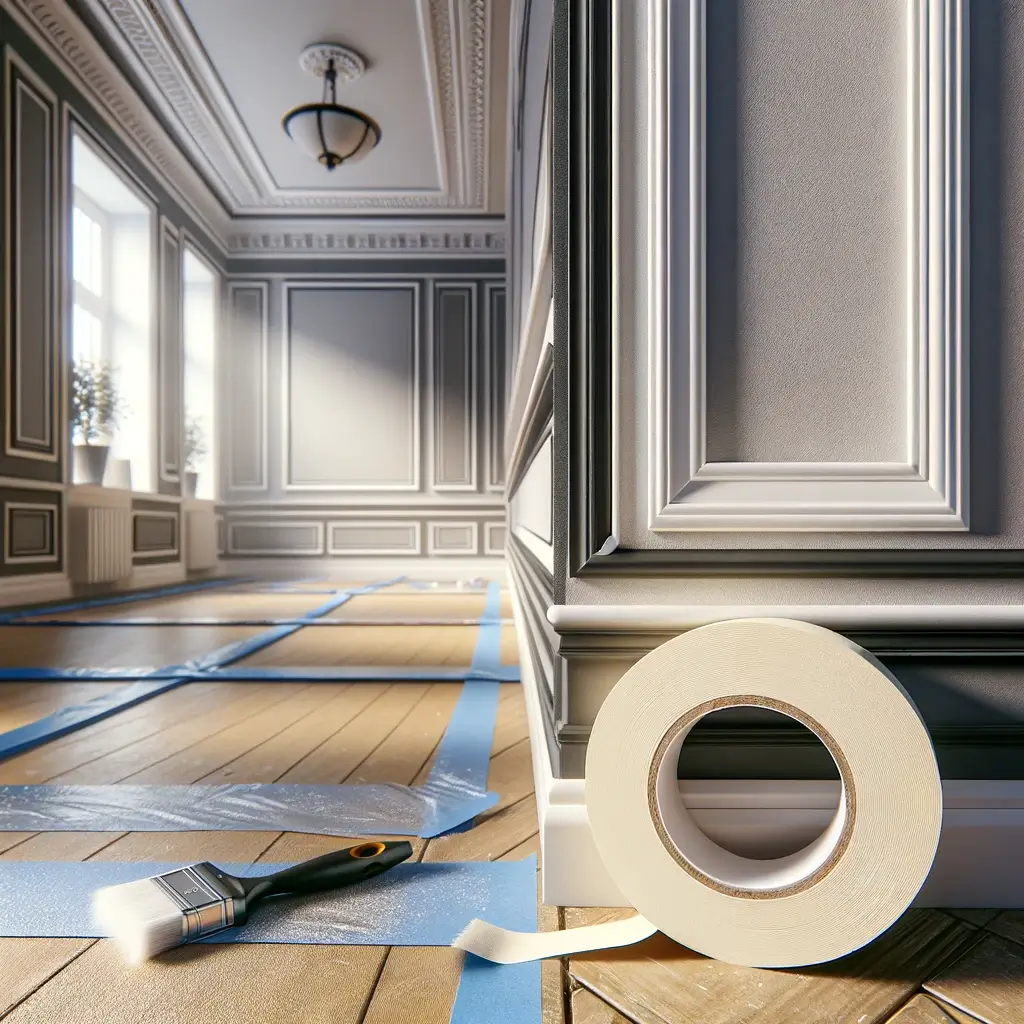
Detailing your room with precision, especially around trims and edges, can elevate the overall appearance of your paint job. An essential tool for achieving crisp, clean lines is painter’s tape.
Here’s a step-by-step guide on how to use it effectively:
- Step 1: Choose the Right Tape: Select a high-quality painter’s tape. Look for one that is specifically designed for the surface you are working on.
- Step 2: Clean the Surface: Make sure the surface is clean and dry before applying the tape. Dust and dirt can prevent the tape from adhering properly.
- Step 3: Apply the Tape: Carefully apply the tape along the edge of the trim or area you want to protect. Make sure it’s straight and aligned precisely where you want your paint line.
- Step 4: Press Down Firmly: Use a putty knife or your fingers to press down the edges of the tape firmly. This helps prevent paint from bleeding under the tape.
- Step 5: Paint with Care: When painting near the tape, use even strokes and avoid loading too much paint on your brush or roller to reduce the chances of seepage.
- Step 6: Remove tape at the Right Time: Timing is key. Remove the tape while the paint is still a bit wet or tacky, but not overly wet, as this can cause smearing. Gently pull the tape back on itself at a 45-degree angle for the cleanest edge.
- Step 7: Touch Up if Necessary: If you notice any imperfections or bleeds after removing the tape, touch them up carefully with a small brush.
The Painting Process: Techniques and Tips
Starting on the painting process is when your vision starts to come to life.
Whether you’re a novice or have some experience, using the right techniques is key to achieving a professional-looking finish.
Here are some steps and tips to guide you through the process.
How to Apply Paint:
- Start with the Ceiling: Always begin with the ceiling to avoid drips on freshly painted walls. Use a roller with an extension pole for even coverage.
- Paint the Edges: Use a brush to cut in along edges and corners. This means painting the perimeter of the walls near the trim, ceiling, and corners.
- Roll the Walls: Dip the roller into the paint tray, rolling it back and forth to get an even coat. Start from the top and work down in a ‘W’ or ‘M’ pattern for even distribution.
- Apply Multiple Coats: Wait for the first coat to dry completely before applying the second coat. This ensures depth of color and a uniform finish.
- Maintain a Wet Edge: To avoid lap marks, maintain a wet edge by overlapping the last stroke with the next.
- Use Angled Brushes for Trim: When painting trims and baseboards, use an angled brush for better precision.
Ceiling Painting: Techniques for a Flawless Finish
- Prep the Ceiling: Clean and repair any cracks or peeling areas. Use primer if necessary.
- Use a Roller with an Extension Pole: This allows for more control and even coverage.
- Start in a Corner: Start painting in one corner and work across in overlapping rows.
- Apply Light Strokes: Avoid heavy pressure. Light strokes reduce splatter and produce a smoother finish.
- Keep a Wet Edge: Like with walls, maintain a wet edge to avoid streaks and lines.
- Consider a Second Coat: A second coat might be needed for a uniform look depending on the color and coverage.
- Work in Sections: Don’t try to cover the entire ceiling simultaneously. Work in manageable sections for consistency.
Remember, patience and attention to detail are the key to a great paint job. Take your time, and don’t rush the process.
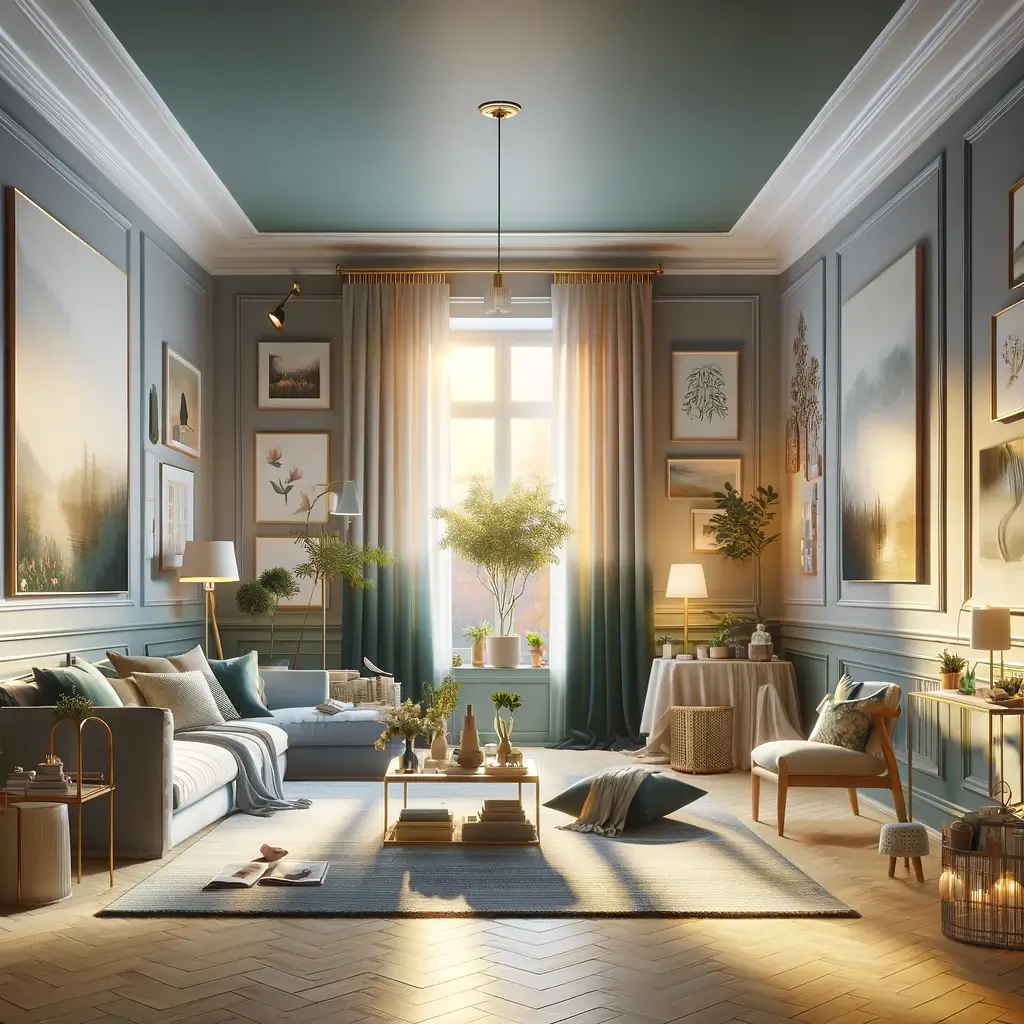
Final Touches: Perfecting Your Room’s New Look
Transforming a room with paint is like creating a masterpiece. The final touches are what set a good job from a great one.
In the world of DIY room painting, these finishing elements are crucial. They’re the subtle details that highlight your room’s features, reflect your personal style, and showcase your hard work.
Let’s explore how to add these finishing touches and review your work to ensure a professional, polished result.
Adding Finishing Touches
Accentuate with Accessories
- Complement with Curtains: Choose curtains that match or contrast with your new wall color. Light, airy fabrics add a sense of freshness, while heavier drapes can offer a touch of elegance.
- Rugs and Throws: A new rug or a few colorful throws can tie the room together, especially if they echo the colors on your walls.
- Artwork and Photos: Hang artwork or family photos. Their frames should complement the paint color and the room’s overall theme.
Illuminate with Lighting
- Layer Your Lighting: Use a mix of overhead, floor, and table lamps to create ambiance and highlight certain areas.
- Feature with Focus Lights: Use focus lights to highlight paintings or unique wall features, adding depth and character.
Green Touch with Plants
- Indoor Plants: Add a few potted plants or a vase of fresh flowers. They bring life and color, creating a welcoming atmosphere.
Reviewing Your Work
Inspect for Imperfections
- Check for Drips and Streaks: Look closely for any drips or streaks that might have gone unnoticed during painting.
- Touch-Up as Needed: Use a small brush to touch up any areas that need a bit of extra paint.
Evaluate Color Consistency
- Look at Different Times of Day: Check how the color looks under different lighting conditions. Colors can change appearance from morning to night.
Assess Overall Balance
- Room’s Harmony: Ensure that the colors, furniture, and accessories are in harmony. Everything should feel cohesive, not clashing or overwhelming.
Seek Feedback
- Family and Friends: Sometimes, fresh eyes can offer valuable perspectives. Invite feedback from family or friends.
Plan for Maintenance
- Cleaning and Upkeep: Consider how to maintain your walls. Some paints might need regular wiping or specific cleaning methods.
Adding the final touches to your painted room is like adding the last piece to a puzzle.
It’s the moment where everything comes together, creating a harmonious and inviting space.
Remember, these final steps are not just about aesthetics but about creating a space that resonates with your personality and becomes a haven for you and your loved ones.
Cleanup and Maintenance: Preserving Your Masterpiece
After the hard work of painting, cleaning up effectively and maintaining your newly painted room to preserve its beauty is essential.
Effective Cleanup Tips Post Painting:
- Proper Disposal of Materials: Safely dispose of or store any leftover paint. Seal paint cans tightly for future touch-ups and follow local regulations for disposing of hazardous materials.
- Clean Brushes and Rollers: Clean brushes and rollers immediately after use. Use soap and water; use mineral spirits for oil-based paints.
- Remove Painter’s Tape Carefully: Gently peel off the painter’s tape at a 45-degree angle to avoid damaging the fresh paint. Do this while the paint is still a bit tacky.
- Tidy the Area: Collect all tools, drop cloths, and other materials. Check for any spills or splatters and clean them up promptly.
- Ventilate the Room: After cleaning, leave the room well-ventilated to dry out the paint and clear out any fumes.
Maintaining Your Newly Painted Room:
- Wait for the Paint to Cure: Allow enough time for the paint to fully cure, which can take a few days to several weeks, before washing or touching the walls.
- Gentle Cleaning: Use a soft cloth or sponge with mild soap and water when cleaning painted walls. Avoid harsh chemicals or abrasive materials.
- Touch-Up as Needed: Keep some leftover paint for touch-ups. Small chips and scratches can be easily covered without repainting the whole wall.
- Avoid Harsh Sunlight: If possible, use window treatments to prevent direct sunlight, which can fade paint colors over time.
- Regular Dusting: Regularly dust the walls and trims to keep the paint looking fresh and prevent dirt and grime buildup.
Frequently Asked Questions
How Long Does It Take for Paint to Dry Between Coats?
The drying time for paint varies based on the type of paint and environmental conditions. Typically, latex paints dry to the touch within an hour and are ready for a second coat after four hours. Oil-based paints may take up to six to eight hours to dry to the touch and 24 hours before applying a second coat.
Can I Paint Over the Wallpaper?
Yes, you can paint over wallpaper, but it requires proper preparation. First, ensure the wallpaper is firmly adhered to the wall. Next, clean it and apply an oil-based primer to prevent the wallpaper’s pattern or color from bleeding through. Once the primer is dry, you can paint over it as you would on a regular wall.
How Do I Prevent Paint from Dripping or Running?
Avoid overloading your brush or roller with paint to prevent drips and runs. Apply paint in thin, even layers, and smooth out any drips as soon as they occur. Using the right type of brush or roller for your paint and wall texture also helps.
What’s the Best Way to Store Leftover Paint?
To store leftover paint, seal the can tightly by tapping the lid down with a hammer. Store it in a cool, dry place away from extreme temperatures. For long-term storage, consider transferring the paint to a smaller container to reduce air exposure, which can cause the paint to dry out.
Should I Paint the Trim or Walls First?
It’s generally recommended to paint the trim first, as it’s easier to tape off and protect the trim than the walls. After the trim paint has dried, you can tape it off and proceed to paint the walls. This method helps achieve cleaner lines and a more professional-looking finish.
Conclusion: Reflecting on the Transformation
The journey of DIY room painting is a rewarding blend of creativity and self-expression.
As you admire your newly transformed room, reflect on the skills learned, the challenges overcome, and the unique personal touches you’ve added.
Your experience, from the color choices to the final stroke, is not just a home improvement but a witness to your hard work and dedication.
Share your story and inspire others in the DIY community. Let your transformed space be a light for others to embark on their painting adventures.


